Agent Tesla Analysis [Part 1: Unpacking]
Introduction
Agent Tesla is a popular info stealer coded in C# that consistently makes lists as one of the most prevalent malware strains. In this post we will be looking at a sample of Agent Tesla that has been packed by a very popular crypter. I am currently not aware of the name of the particular crypter responsible, but the amount of samples I am seeing daily being packed by it is insane. Despite this, I’ve only found 3 other articles documenting this crypter (here, here and here), but they are not very detailed, especially in explaining how to unpack the malware. The goal of this post is to explain how to unpack the final payload, starting from the beginning.
UPDATE 04/02/2024: Checkpoint Research has posted an article which identifies the packer used to protect these samples as Cassandra Protector.
First Stage
We begin by opening the initial file [MD5:B89F6062D174E452D189EC4248AF489C] in popular .NET decompilation tool dnSpy. We right click the assembly and select ‘Go to Entry Point’. We take notice of the line Application.Run(new DangNhap());. This creates a new instance of a Windows Form. We click on the DangNhap part to navigate to the class. There, we see this.InitializeComponent(); in the constructor. Again, we click on InitializeComponent to go to its code. Looking at the top of the method, nothing seems immediately suspicious. However, as we scroll down more we see something peculiar:
 Figure 1
This code fetches a resource named Lux3. Next, it performs a decryption routine on the resource. Once the routine is done, it dynamically calls Assembly.Load() to load the newly decrypted module. After this, it gets the Type at index 9 in the assembly, and the method at index 3 from the aforementioned type. It splits the class variable ‘Discart’ (defined as private string Discart = "62657A54_626C66";) by the underscore delimeter and invokes the method passing both halves of the delimeted string and the string “Sync_Center”.
We need to debug the code and follow execution into the new assembly. To do this, we will place a breakpoint on the line here by clicking to the left of it by the line number. We will then begin debugging by clicking the Start button at the top of the window.
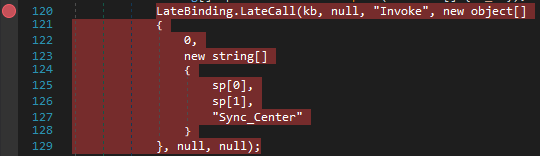 Figure 2
Once the breakpoint is hit, we can observe in the Locals pane all the local variables. If we take a look at the kb local variable we can see its value:
 Figure 3
Take note of the full path DeclareTextBoxValue.QuickSort.trist here, DeclareTextBoxValue is the assembly, QuickSort is the class, and trist is the method being called.
If we go to the Modules pane (select Debug->Windows->Modules to display this pane), this new module is visible:
 Figure 4
Double clicking on the DeclareTextBoxValue assembly will open the assembly in-memory in dnSpy. We can then navigate to the method trist like so:
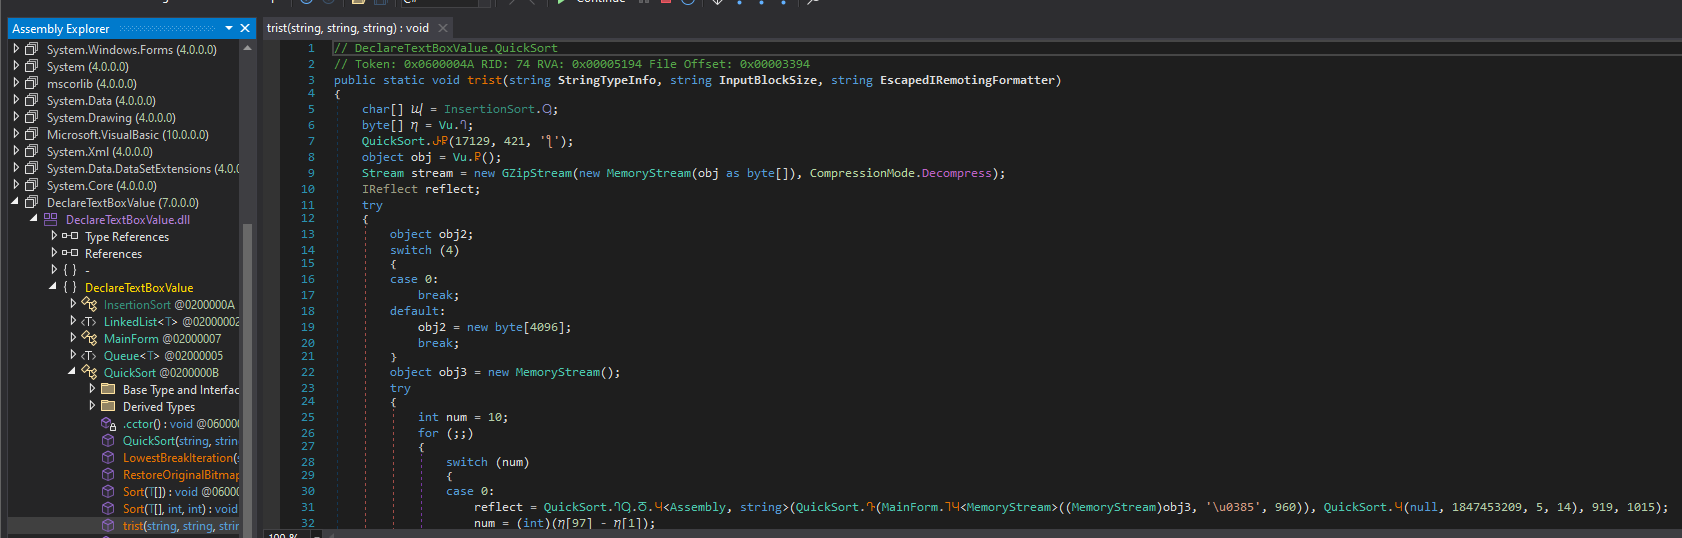 Figure 5
Second/Third Stage
Upon arriving at the method in the second stage, it is immediately clear that it is much too obfuscated to read. We will need to deobfuscate the assembly. Let’s try saving/dumping this new assembly so we have access on the disk to it. Right click the DeclareTextBoxValue module in the Modules pane and save it to the disk.
We will attempt to use popular .NET deobfuscation tool de4dot and hope that this takes care of the obfuscation.
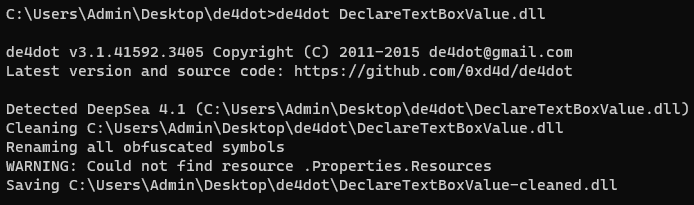 Figure 6
This output looks promising. The next step is drag and drop the newly outputted DeclareTextBoxValue-cleaned.dll into dnSpy and navigate to that same method. Let’s see how it looks now:
 Figure 7
This is MUCH more readable. Let’s break down what is going on here. Firstly, we see a call to Thread.Sleep() which delays execution for 17129 milliseconds. Then, a byte array is returned from a call to Vu.smethod_0. Navigating to this method shows that it is pulling the byte array from a resource named Key0:
 Figure 8
Following this, the array is decompressed to an assembly. QuickSort.smethod_4 is called which is simply a wrapper for Assembly.Load(). The type ReactionDiffusionLib.ReactionVessel is then extracted.
An instance is created of the type, and the method CasualitySource is invoked twice. In order to see what this method is actually doing, we’re going to need to continue our debugging and get into that assembly.
In order to do this, we will go back to the original obfuscated assembly in dnSpy that is currently loaded in memory. Since the code is obfuscated, it will be difficult to find the call to Assembly.Load(). What we will do instead is go into the library itself and put a breakpoint on every overload of Assembly.Load().
 Figure 9
 Figure 10
Let’s now resume execution. It will take a moment because of that Thread.Sleep() from earlier.
 Figure 11
Nice, it hit one of our breakpoints. Let’s step through and see what was loaded.
 Figure 12
 Figure 13
This assembly that was loaded here with the odd symbol as the name is actually part of DeepSea Obfuscator’s resource encryption. In the screenshot of the decompiled output of DLL that de4dot cleaned, it decrypted the resource and removed that portion of the code. Thus, we can simply continue on to the next Assembly.Load() which should be the same as the first one in the de4dot-cleaned DLL (called on line 23).
 Figure 14
Now this looks interesting. Let’s step out of the function and see what was just loaded.
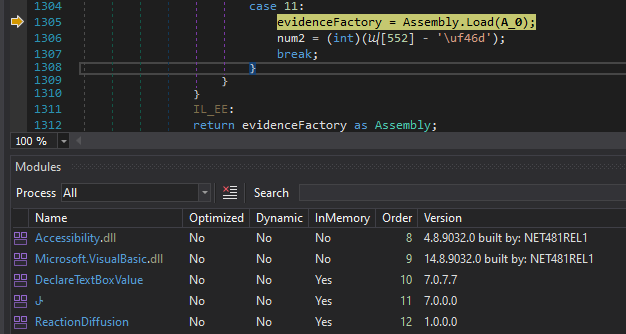 Figure 15
Aha! There is the assembly we saw before: ReactionDiffusionLib. Now, let’s dump it so we can investigate. This assembly is obfuscated as well, so we’ll run it through de4dot first. Afterwards, we can open the deobfuscated assembly and investigate it as well as the two methods it calls:
 Figure 16
 Figure 17
As we can observe above, CasualitySource takes a string and decodes it. This is called twice, once for each half of that string (62657A54 and 626C66) we saw in the beginning.
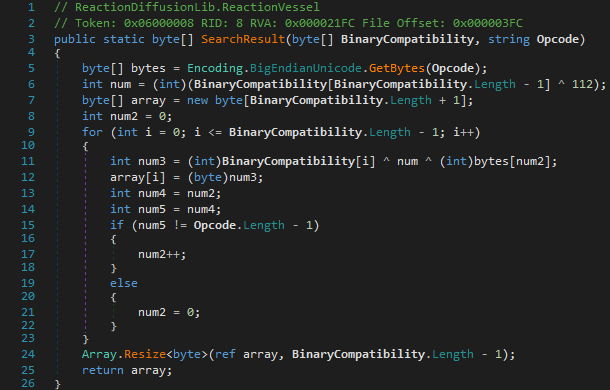 Figure 18
In the case of SearchResult, it decrypts a byte array using XOR operations.
Returning back to the previous module, we can see that after decoding those two strings it passes the first one (variable bezT) and EscapedIRemotingFormatter to function QuickSort.LowestBreakIteration.
 Figure 19
This function reaches back into the stage one assembly and extracts a resource. The resource in this case is a bitmap named bezT.
 Figure 20
Then, a function called RestoreOriginalBitmap() is called on the extracted bitmap. The point of this function is to trim off unnecessary information from the bitmap.
 Figure 21
The result of this function is then passed to `SearchResult’, which as we saw earlier is performs a decryption routine.
Finally, smethod_4 and smethod_3 are called on the decrypted “bitmap” (which is really the fourth stage payload)
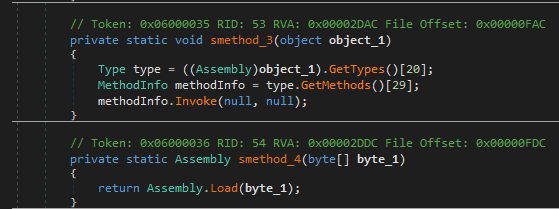 Figure 22
Now that we have a complete understanding of the second and third stages, we will once again press the continue button so we can reach that last Assembly.Load() call.
 Figure 23
Now, we step out of the function:
 Figure 24
A new module named Tyrone (lol) has been loaded. At this point we can simply keep stepping until we end up in the module. This is a little bit annoying, but it pays off as well get here to the obfuscated equivalent of smethod_3:
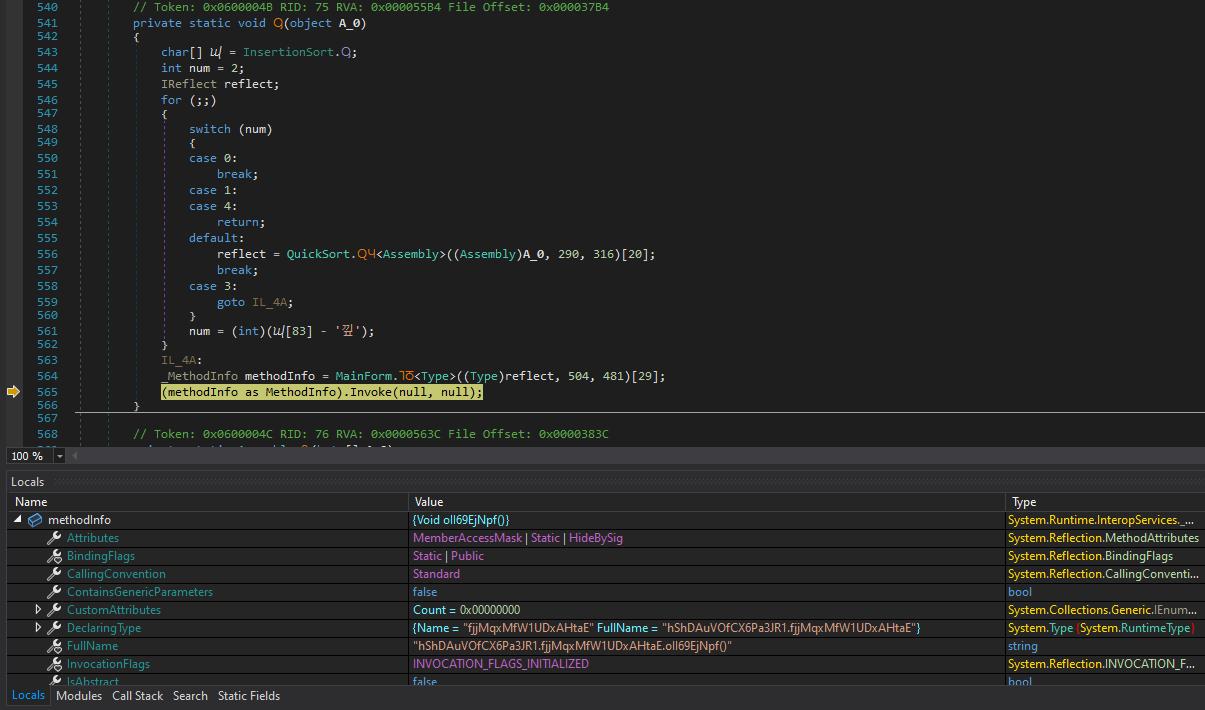 Figure 25
Fourth Stage
The method oII69EjNpf of class fjjMqxMfW1UDxAHtaE in namespace hShDAuVOfCX6Pa3JR1 in the Tyrone module is about to be executed next. Let’s beat it to the punch and put a breakpoint there so we can catch it when it executes.
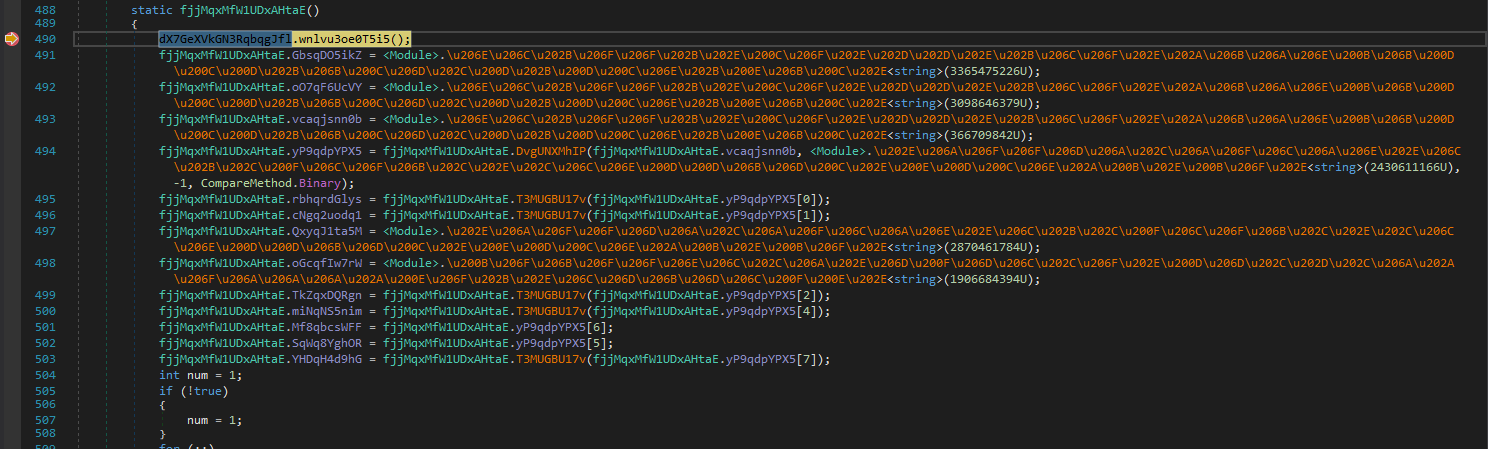 Figure 26
Well, this is some gnarly looking decompiler output. Let’s rely again on our friend de4dot and run the dumped module through it.
After doing that, loading the result in dnSpy and going back to the function we were just in, we are presented with this:
 Figure 27
de4dot appears to have been able to partially remove the control flow flattening, but not decrypt the strings. I attempted to manually decrypt them using a de4dot feature which allows you to specify the string decryption function token, but that failed as well. The other option we could do is write our own string decryptor or de4dot plugin. However, this article is focused particularly on unpacking and something like that is a bit out of scope for what we are doing. Luckily for any of you curious readers, we will be writing a custom de4dot plugin in the next article! For now, we are unfortunately going to have to resort to manually debugging the rest of the code until we can extract the final stage payload.
But…it sure would be a shame to lose the unflattened control flow we gained from running the module through de4dot. That is when I had an idea. If we look back at Figure 22, the method from Tyrone is called with null parameters. That means, we could make a tiny C# loader to execute the deobfuscated assembly and have the benefit of the improved control flow to make our debugging easier! Let’s do it!
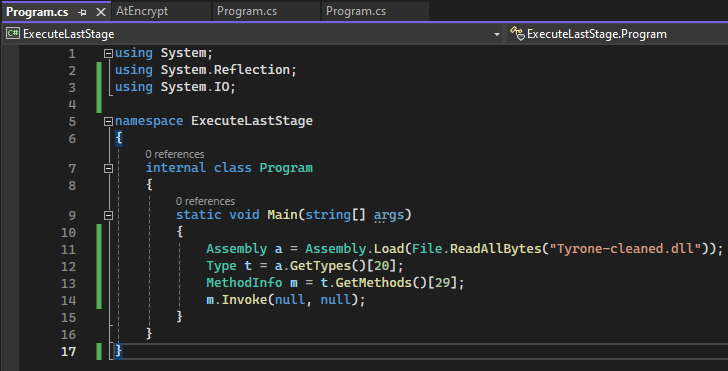 Figure 28
We will drag our compiled binary into dnSpy (making sure it’s in the same directory as Tyrone-cleaned.dll) and throw a breakpoint on the m.Invoke(null, null) part and run it.
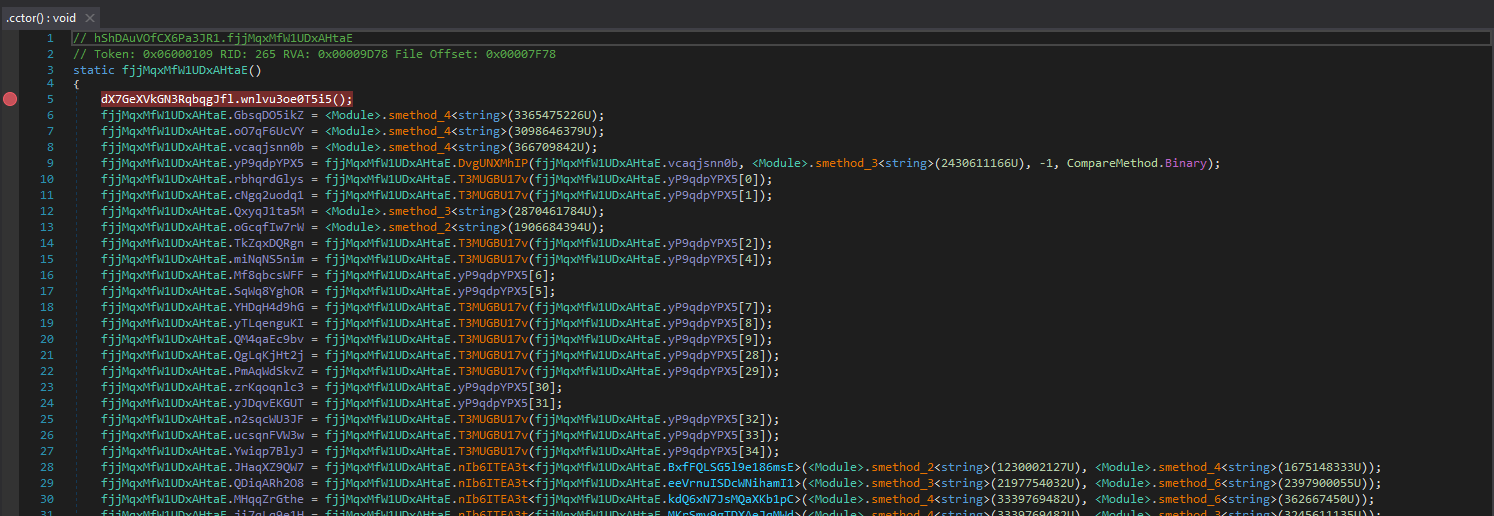 Figure 29
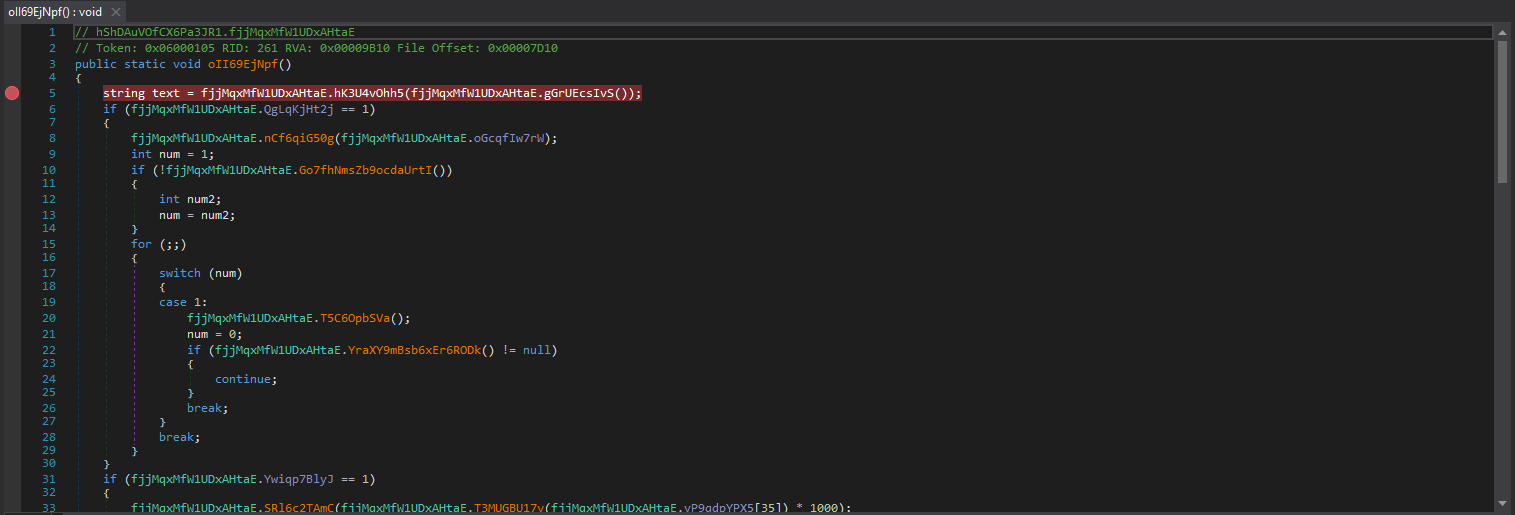 Figure 30
I have my breakpoints set on the class constructor and target function. Now let’s finish this once and for all! Stepping all the way to the end of the constructor sets all the global variables like so:
 Figure 31
Function oII69EjNpf starts off by getting the path of the current assembly
 Figure 32
 Figure 33
 Figure 34
Then it attempts to open a mutex bncFrQuGyBTmIf. If it succeeds, the process terminates. Otherwise, it will create the mutex.
 Figure 35
 Figure 36
 Figure 37
 Figure 38
 Figure 39
There is an optional thread sleep that is executed depending on the configuration of the crypter. In this particular sample is is not executed.
 Figure 40
 Figure 41
 Figure 42
There is another check to determine if the crypter should display a messagebox, which again this sample does not do.
 Figure 43
 Figure 44
Next, there another unperformed check exists which will attempt to elevate privileges if the file is not being ran as an admin. This code again is not triggered in this sample
 Figure 45
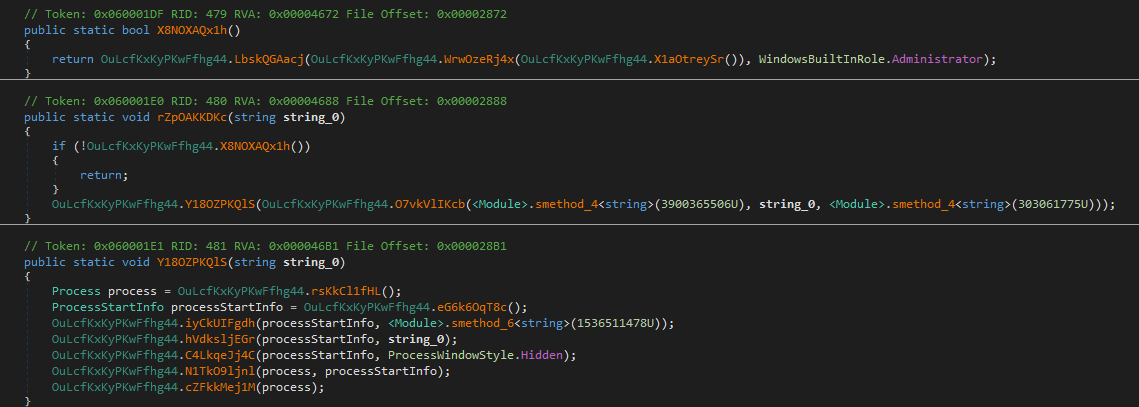 Figure 46
Another configuration-based decision is the possibility to download and execute another file (which does not happen in this case.)
 Figure 47
 Figure 48
The code then decides if it wants to copy to AppData for persistence, which it does not do.
 Figure 49
However in the case that it does do that, it will change the copied file’s ACL permissions to perserve itself like so:
 Figure 50
Then, the final payload 8cLv8 is extracted from the resources and decrypted.
 Figure 51

There is a final check which determines the execution type (Reflection or Process Hollowing)
 Figure 52
At this point, the injection type used is irrelevant (although if you are curious in this case it does use process hollowing). Since the payload has already been decrypted, we can simply dump that byte array fjjMqxMfW1UDxAHtaE.obLq1XEEqU from the static fields pane in dnSpy.
Opening the dumped file in dnSpy confirms that it is indeed Agent Tesla
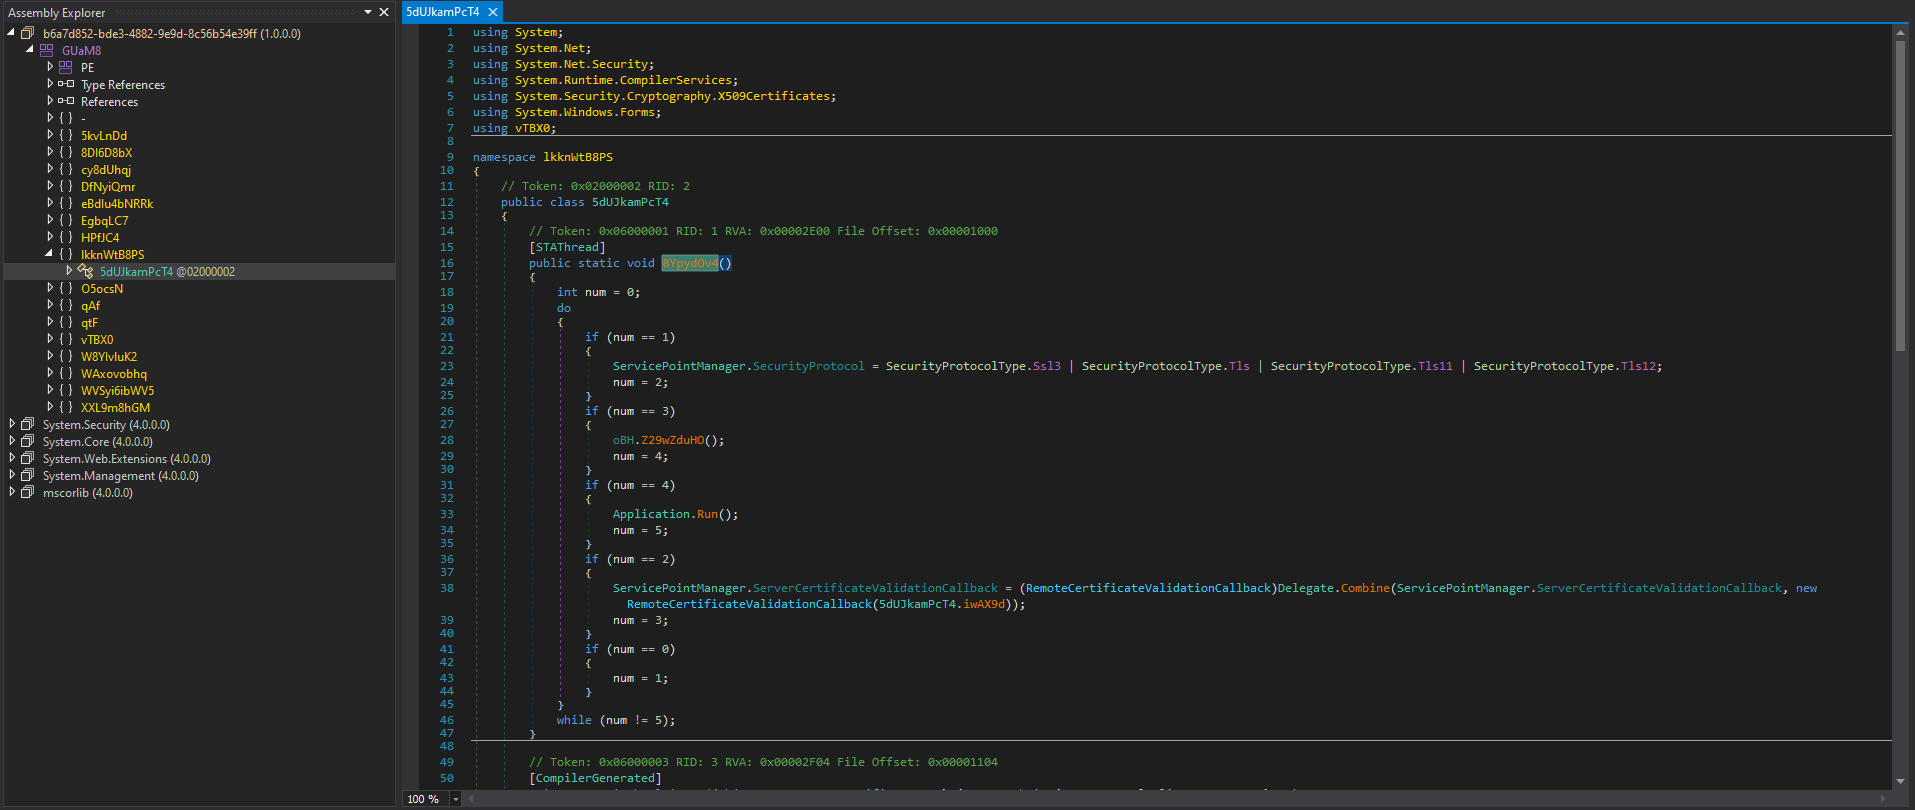 Figure 53
I recommend checking out my next post where I demonstrate how to remove Agent Tesla’s control flow flattening by writing a de4dot plugin!
IOCs
| File | MD5 |
|---|---|
| Initial File/Stage One | B89F6062D174E452D189EC4248AF489C |
| DeclareTextBoxValue.dll | 08ed70a40aa366a9d6e21cba736f4435 |
| ReactionDiffusion.dll | 440bb4db146ccb1161ac2bcf365d7676 |
| Tyrone.dll | a2f3cd39918ea671f5c983eccfd004d2 |
| Agent Tesla Payload | 624b552d1e7457a345f89b6aa1d6c75b |