Deobfuscation of Lumma Stealer
Introduction
Lumma Stealer is an infostealer that has been around for several years now, and consistently tops statistics on sites like MalwareBazaar as one of the most commonly distributed malware families. When it first released, Lumma Stealer had little to no obfuscation at all. Eventually, it incorporated things like control flow flattening, opaque predicates and more recently around the beginning of 2024 began using control flow indirection. I set about developing a Hex-Rays plugin to deobfuscate the sample from the first link prior to the news about control flow indirection being added. However, this methodology should still be applicable to the newer version as long as the control flow indirection is removed first. In this writeup, I will go through the different challenges I experienced during this project and how I overcame them.
Initial Analysis of the Obfuscation
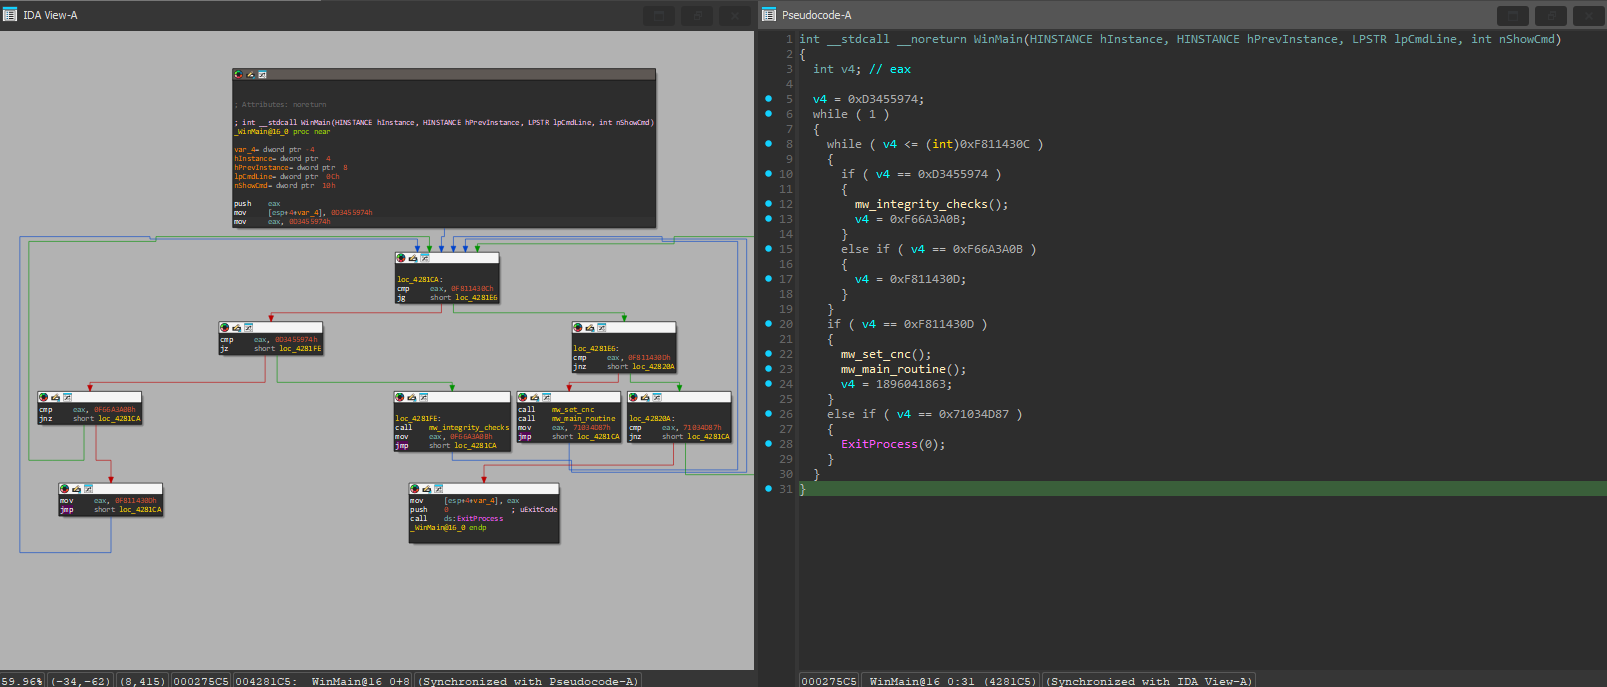
Upon opening the WinMain() function in IDA, we can immediately see that control flow flattening has been applied. This is one of the simplest instances in this particular binary:
All that is required to solve this function is more or less what I did in my old Agent Tesla post, which is to find which blocks correspond to the mapping numbers and patch the flattened blocks to jump to their proper destinations. Here, we either have jz or jnz instructions which check the dispatcher variable (eax register) value. If it matches and the opcode is jz, the jump is taken. Otherwise, if it’s jnz the fallthrough branch is taken. This is how it would look in it’s unflattened form:
1
2
3
4
5
6
7
int __stdcall __noreturn WinMain(HINSTANCE hInstance, HINSTANCE hPrevInstance, LPSTR lpCmdLine, int nShowCmd)
{
  mw_integrity_checks();
  mw_set_cnc();
  mw_main_routine();
  ExitProcess(0);
}
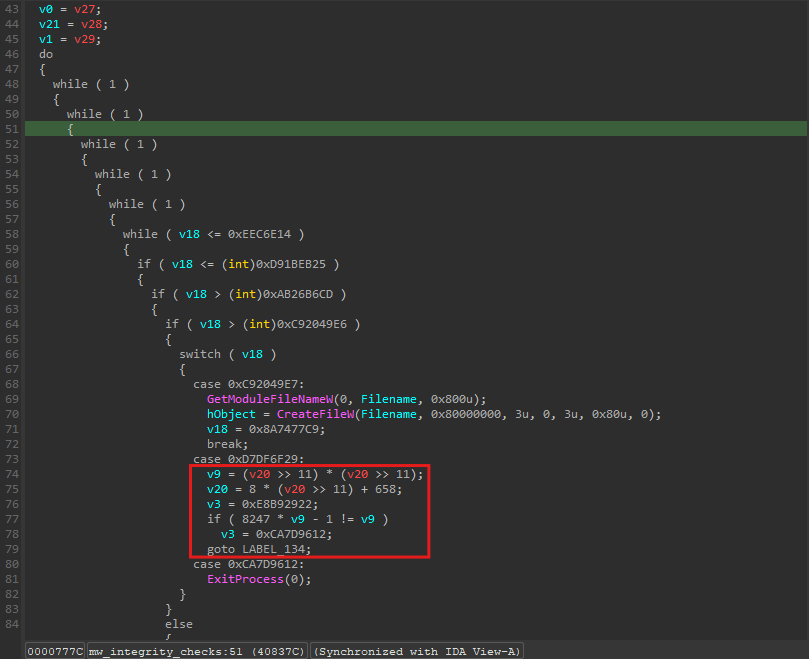
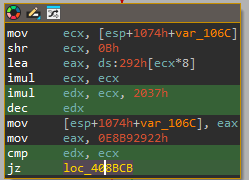
The next function looks much more complex. Not only is it much longer at 400 lines, but something weird is going on - there is a pattern that is repeated constantly in the function. It seems to involve a bunch of math operations, ends with an if statement which multiples a variable (in this case v9) by a random 16-bit constant, then subtracts 1 and checks if it equals v9. The dispatcher value changes depending on if this is true or not.
After looking closely, we can determine that these are opaque predicates.
1
8247 * v9 - 1 == v9
Why? Because the above would require v9 to be a fraction to be true, and these are integers. Therefore, the true branch of the jz is NEVER taken, and leads to junk code. That means v3 will always be set to 0xCA7D9612. There are additionally blocks that use jnz instead, and in those cases the opposite is true where the true branch is always taken.
But we aren’t out of the woods yet with this function. There is yet another problem:
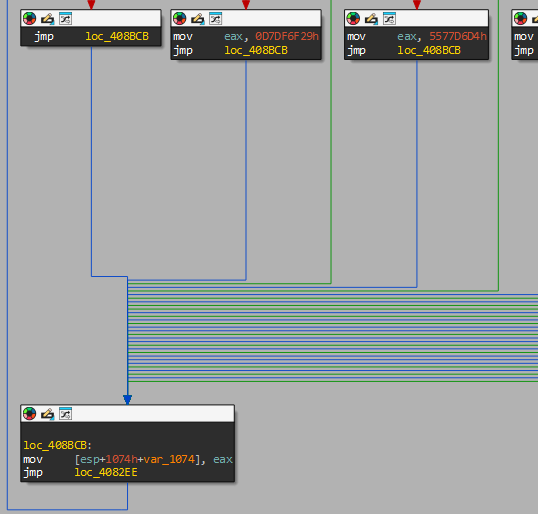
A large amount of the flattened blocks don’t go directly back to the dispatcher. They go to what I call an ‘optimization block’. What is happening here is that since all of the affected blocks have their variable result stored in the eax register and require it to be moved to the stack variable var_1074, the compiler created one block and pointed them all to it instead of having a copy of that same ‘optimization’ block for every affected flattened block.
I noted down the aforementioned issues preventing me from unflattening for later, and began thinking of where to begin development of a plugin that would deobfuscate the binary.
Choosing a Starting Point
I had never worked with the Hex-Rays API at all before this, but I was aware of two projects that utilized it to deobfuscate flattened code. The first one is the original HexRaysDeob plugin written in C++ by Rolf Rolles of which every other Hex-Rays unflattener plugin has been based off of. If you have not read his writeup, I would suggest to do so as I consider it required reading. The second is D810 by Boris Batteux, which is written in Python and supports plugins/profiles in itself. I also highly recommend reading this writeup as well. However, not only am I much more comfortable using C/C++ over Python, but I wanted to work directly with the microcode itself and not have to in addition learn the inner workings of D-810, so I opted to update the former. In the end, various challenges I encountered would result in me more or less completely gutting the original plugin code.
The Journey Begins
During the development of the plugin, I didn’t necessarily go in the exact order as described below. I tried removing the opaque predicates before completely finishing the unflattening removal, which turned out to be a mistake. I also bounced around many functions, sometimes not finishing one before I began another and going back. However, to make the flow of this writeup easier to follow I will describe the process of the flattening removal function-by-function and then move on to the opaque predicates.
The original plugin works by finding the most frequent occurence of a comparison between a certain register or stack variable, which will be referred to as the dispatcher variable. Each of these comparison blocks’ numeric value that is being compared is then saved into a map with its corresponding child block. Next, the code detects mov instructions that move a numeric value into that variable, and patches those at the end to be jumps to the corresponding comparison block’s child block. Unmodified, it only searched for comparisons using the jz opcode. The first change I made to the plugin was about as easy as it gets: I added handling for the jnz cases as well. This change resulted in the unflattening of the WinMain() function.
1
2
3
4
5
6
7
8
9
10
11
12
13
14
15
16
17
18
19
20
21
22
23
24
25
26
27
28
29
30
31
32
33
int visit_minsn(void)
{
	// We're looking for jz instructions that compare a number ...
	if ((curins->opcode != m_jz && curins->opcode != m_jnz) || curins->r.t != mop_n)
		return 0;

	// ... against our comparison variable ...
	if (!equal_mops_ignore_size(*m_CompareVar, curins->l))
	{
		// ... or, if it's the dispatch block, possibly the assignment variable ...
		if (blk->serial != m_DispatchBlockNo || !equal_mops_ignore_size(*m_AssignVar, curins->l))
			return 0;
	}

	int blockNo;

	switch (curins->opcode)
	{
	case m_jz:

		// ... and the destination of the jz must be a block
		if (curins->d.t != mop_b)
			return 0;

		blockNo = curins->d.b;
		break;
	case m_jnz:
		blockNo = blk->succ(0);
		break;
	}

  .......
}
Next, I moved on to mw_integrity_checks(). Ignoring the opaque predicates, the major problem here is the optimization blocks. As described before, they do not create a direct path to the dispatcher since there are a massive amount of flattened blocks pointing to the opt block. My initial solution was based on the assumption that all of these optimization blocks only contained the instruction which moved the numeric value from whatever variable it was being stored in into the correct dispatcher variable. I treated each optimization block as its own dispatcher, noted down the variable it was using and iterated its predecessors, pointing them to the correct blocks.
1
2
3
4
5
6
7
8
9
10
11
12
13
14
15
struct opt_block_info
{
	int block_num;
	mop_t op; // The operand that is being mov'd into first before the dispatcher variable
};

for (auto opt_block : cfi.opt_blocks)
{
	// For optimization
	for (auto opt_pred : mba->get_mblock(opt_block.blockNum)->predset)
	{
		unflatten(opt_pred, opt_block.op, ...);
	}
	...
}
The function then could be decompiled in unflattened form without error. However, the assumption I made turned out to be incorrect. In less common cases, other functions in the binary had other code besides the single mov in the optimization block. By doing what I did, I was losing vital code for the function. Not knowing this at the time, I continued on.
Optimization Woes
The next couple functions mw_display_crypt_warning() and mw_send_empty_get_req() seemed to unflatten fine with the code I had. That means the next function on the list was the third call in the WinMain(), mw_main_routine(). Upon decompiling the function, I was greeted with over 3000 lines of obfuscated code.
Additionally, when I tried to decompile the function with my plugin enabled it failed to detect the dispatcher variable being used. I started debugging to find the problem, and the first thing I did was check the assembly view in IDA to see if there was anything peculiar.
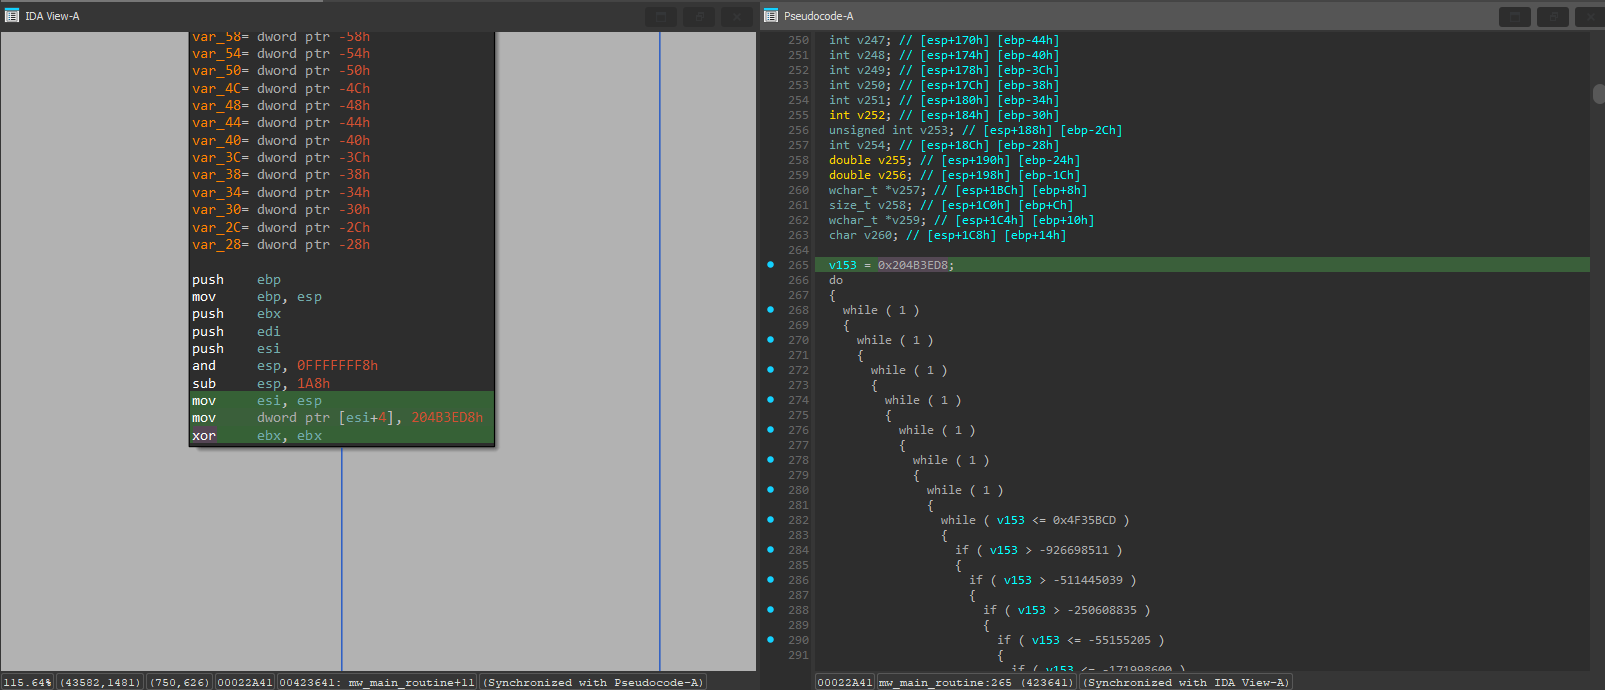
Looking at the first block of the function, we can see that the stack base ebp is being moved into the register esi. Then, a variable at base of stack + 4 is being written to. The difference is, in our previous functions, ebp was used directly. Here it is not. I assumed this wouldn’t be a problem because Hex-Rays optimization should recognize that esi + 4 is a stack variable. This turned out to be incorrect. Rolf’s original project includes a microcode explorer (like the unflattening plugin, the first of its kind) which can be used to view the microcode as a graph. I opened the microcode explorer and browsed the microcode maturity level I was operating at, MMAT_LOCOPT.
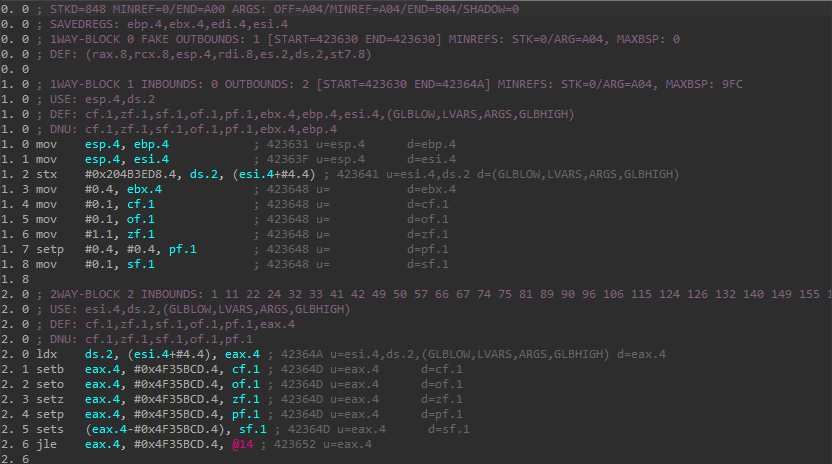
That is when the issue started to become a bit more clear:
The mov instructions that accessed the stack through esi were not being recognized as stack variables by Hex-Rays. Forward propagation had not been performed, so the instructions were either ldx or stx instead of mov. This was a major problem, because my code was looking specifically for mov instructions. I thought of a few ways to fix this problem. The first was to implement a second handling which would look for ldx and stx instructions in the case the optimization was not applied. I did not like this idea at all, as it would bloat the code significantly. Another idea I had was to see if I could operate at a later maturity level like MMAT_CALLS. After looking into this idea, I noticed it introduced another optimization-related problem.
1
2
3
4
5
6
7
8
9
10
11
12
13
14
15
16
17
18
19
20
21
22
23
24
25
26
27
28
29
30
31
32
33
34
35
36
37
38
39
; 1WAY-BLOCK 1 INBOUNDS: 0 OUTBOUNDS: 2 [START=42A9CE END=42AA08] MINREFS: STK=4C/ARG=150, MAXBSP: 3C
; USE: sp+1C.4,(GLBLOW,GLBHIGH)
; DEF: eax.4,esi.4,sp+14.4,sp+20.8,(cf.1,zf.1,sf.1,of.1,pf.1,edx.4,ecx.4,fps.2,fl.1,c0.1,c2.1,c3.1,df.1,if.1,GLBLOW,sp+C.4,GLBHIGH)
; DNU: eax.4,esi.4,sp+14.4,sp+20.8
mov    call $GetSystemMetrics<std:"int nIndex" #0.4>.4, %var_2C.4{1} ; 42A9DF u=(GLBLOW,GLBHIGH) d=sp+20.4,(cf.1,zf.1,sf.1,of.1,pf.1,rax.8,ecx.4,fps.2,fl.1,c0.1,c2.1,c3.1,df.1,if.1,GLBLOW,sp+C.4,GLBHIGH)
mov    call $GetSystemMetrics<std:"int nIndex" #1.4>.4, %cy.4{2} ; 42A9E7 u=(GLBLOW,GLBHIGH) d=sp+24.4,(cf.1,zf.1,sf.1,of.1,pf.1,rax.8,ecx.4,fps.2,fl.1,c0.1,c2.1,c3.1,df.1,if.1,GLBLOW,sp+C.4,GLBHIGH)
mov    #0xB503DEBC.4, %var_38.4 ; 42A9EB u=           d=sp+14.4
mov    #0xB503DEBC.4, eax.4    ; 42A9F3 u=           d=eax.4
mov    %var_30.4{3}, esi.4{3}  ; 42A9F8 u=sp+1C.4    d=esi.4

; 2WAY-BLOCK 2 INBOUNDS: 1 6 9 13 16 18 24 25 27 OUTBOUNDS: 3 10 [START=42AA08 END=42AA0F] MINREFS: STK=2C/ARG=150, MAXBSP: 10
; USE: eax.4
; VALRANGES: eax.4:(==46BC6480|==7B6E7A9B|==97CD0040|==99ED4E33|==B503DEBC), %0x14.4:==B503DEBC
jg     eax.4, #0xC4B3E928.4, @10 ; 42AA0D u=eax.4

; 2WAY-BLOCK 3 INBOUNDS: 2 OUTBOUNDS: 4 14 [START=42AA0F END=42AA16] MINREFS: STK=2C/ARG=150, MAXBSP: 10
; USE: eax.4
; VALRANGES: eax.4:(==97CD0040|==99ED4E33|==B503DEBC), %0x14.4:==B503DEBC
jle    eax.4, #0xAAEC8E2C.4, @14 ; 42AA14 u=eax.4

; 1WAY-BLOCK 4 INBOUNDS: 3 OUTBOUNDS: 5 [START=42AA16 END=42AA21] MINREFS: STK=2C/ARG=150, MAXBSP: 10
; VALRANGES: eax.4:==B503DEBC, %0x14.4:==B503DEBC

; 1WAY-BLOCK 5 INBOUNDS: 4 OUTBOUNDS: 27 [START=42AA21 END=42AA2C] MINREFS: STK=2C/ARG=150, MAXBSP: 10
; VALRANGES: eax.4:==B503DEBC, %0x14.4:==B503DEBC
goto   @27                     ; 42AA26 u=

; 2WAY-BLOCK 6 OUTBOUNDS: 7 2 [START=42AA2C END=42AA33] MINREFS: STK=2C/ARG=150, MAXBSP: 10
; USE: eax.4
jnz    eax.4, #0xC0031B52.4, @2 ; 42AA31 u=eax.4

; 2WAY-BLOCK 7 INBOUNDS: 6 OUTBOUNDS: 8 9 [START=42AA33 END=42AA4B] MINREFS: STK=2C/ARG=150, MAXBSP: 10
; USE: esi.4,(GLBLOW,sp+2C..,GLBHIGH)
; DEF: eax.4,esi.4,(cf.1,zf.1,sf.1,of.1,pf.1,edx.4,ecx.4,fps.2,fl.1,c0.1,c2.1,c3.1,df.1,if.1,GLBLOW,sp+2C..,GLBHIGH)
; DNU: eax.4
sub    (esi.4 >>l #0xF.1), #0x72.4, esi.4{4} ; 42AA36 u=esi.4      d=esi.4
call   $sub_42A9CE <cdecl:>.0  ; 42AA39 u=(GLBLOW,sp+2C..,GLBHIGH) d=(cf.1,zf.1,sf.1,of.1,pf.1,rax.8,ecx.4,fps.2,fl.1,c0.1,c2.1,c3.1,df.1,if.1,GLBLOW,sp+2C..,GLBHIGH)
mov    #0xAAEC8E2D.4, eax.4    ; 42AA3E u=           d=eax.4
jae    esi.4{4}, #0x3800.4, @9 ; 42AA49 u=esi.4
Block 4 is now completely empty and block 5 has been changed to a goto. This is how it looked before in MMAT_LOCOPT
1
2
3
4
5
6
7
8
9
10
11
12
13
14
15
16
17
18
19
20
21
22
23
24
25
26
27
28
29
30
31
32
; 2WAY-BLOCK 6 INBOUNDS: 5 OUTBOUNDS: 7 23 [START=42AA16 END=42AA21] MINREFS: STK=0/ARG=50, MAXBSP: 10
; USE: eax.4
; DEF: cf.1,zf.1,sf.1,of.1,pf.1
; DNU: cf.1,zf.1,sf.1,of.1,pf.1
setb   eax.4, #0xAAEC8E2D.4, cf.1 ; 42AA16 u=eax.4      d=cf.1
seto   eax.4, #0xAAEC8E2D.4, of.1 ; 42AA16 u=eax.4      d=of.1
setz   (eax.4+#0x551371D3.4), #0.4, zf.1 ; 42AA16 u=eax.4      d=zf.1
setp   (eax.4+#0x551371D3.4), #0.4, pf.1 ; 42AA16 u=eax.4      d=pf.1
sets   (eax.4+#0x551371D3.4), sf.1 ; 42AA16 u=eax.4      d=sf.1
jz     eax.4, #0xAAEC8E2D.4, @23 ; 42AA1B u=eax.4

; 2WAY-BLOCK 7 INBOUNDS: 6 OUTBOUNDS: 8 34 [START=42AA21 END=42AA2C] MINREFS: STK=0/ARG=50, MAXBSP: 10
; USE: eax.4
; DEF: cf.1,zf.1,sf.1,of.1,pf.1
; DNU: cf.1,zf.1,sf.1,of.1,pf.1
setb   eax.4, #0xB503DEBC.4, cf.1 ; 42AA21 u=eax.4      d=cf.1
seto   eax.4, #0xB503DEBC.4, of.1 ; 42AA21 u=eax.4      d=of.1
setz   (eax.4+#0x4AFC2144.4), #0.4, zf.1 ; 42AA21 u=eax.4      d=zf.1
setp   (eax.4+#0x4AFC2144.4), #0.4, pf.1 ; 42AA21 u=eax.4      d=pf.1
sets   (eax.4+#0x4AFC2144.4), sf.1 ; 42AA21 u=eax.4      d=sf.1
jz     eax.4, #0xB503DEBC.4, @34 ; 42AA26 u=eax.4

; 2WAY-BLOCK 8 INBOUNDS: 7 OUTBOUNDS: 9 4 [START=42AA2C END=42AA33] MINREFS: STK=0/ARG=50, MAXBSP: 10
; USE: eax.4
; DEF: cf.1,zf.1,sf.1,of.1,pf.1
; DNU: cf.1,zf.1,sf.1,of.1,pf.1
setb   eax.4, #0xC0031B52.4, cf.1 ; 42AA2C u=eax.4      d=cf.1
seto   eax.4, #0xC0031B52.4, of.1 ; 42AA2C u=eax.4      d=of.1
setz   (eax.4+#0x3FFCE4AE.4), #0.4, zf.1 ; 42AA2C u=eax.4      d=zf.1
setp   (eax.4+#0x3FFCE4AE.4), #0.4, pf.1 ; 42AA2C u=eax.4      d=pf.1
sets   (eax.4+#0x3FFCE4AE.4), sf.1 ; 42AA2C u=eax.4      d=sf.1
jnz    eax.4, #0xC0031B52.4, @4 ; 42AA31 u=eax.4
I decided to consult Rolf Rolles himself to find out what was going on. He explained that this is the result of an optimization technique called value range optimization, and it is possible to disable this technique in the Hex-Rays decompiler settings. This meant that my options were either to implement bloated code to handle ldx/stx instructions, or operate in MMAT_CALLS with the requirement that the user of my plugin start screwing around with the decompiler settings every time they want to use it. Both of those options sounded pretty awful, so a third option was devised: Continue to operate in MMAT_LOCOPT, but implement code which fixes all the ldx/stx instruction to be mov with the proper stack variable.
The way I implemented this was to first see if forward propagation was not performed by checking if ldx/stx instructions are being used to access the dispatcher variable. In that case, we note down the register that the stack base was moved into and iterate all instructions which read or write from there, change the opcode to mov and finally create a new stkvar_ref_t.
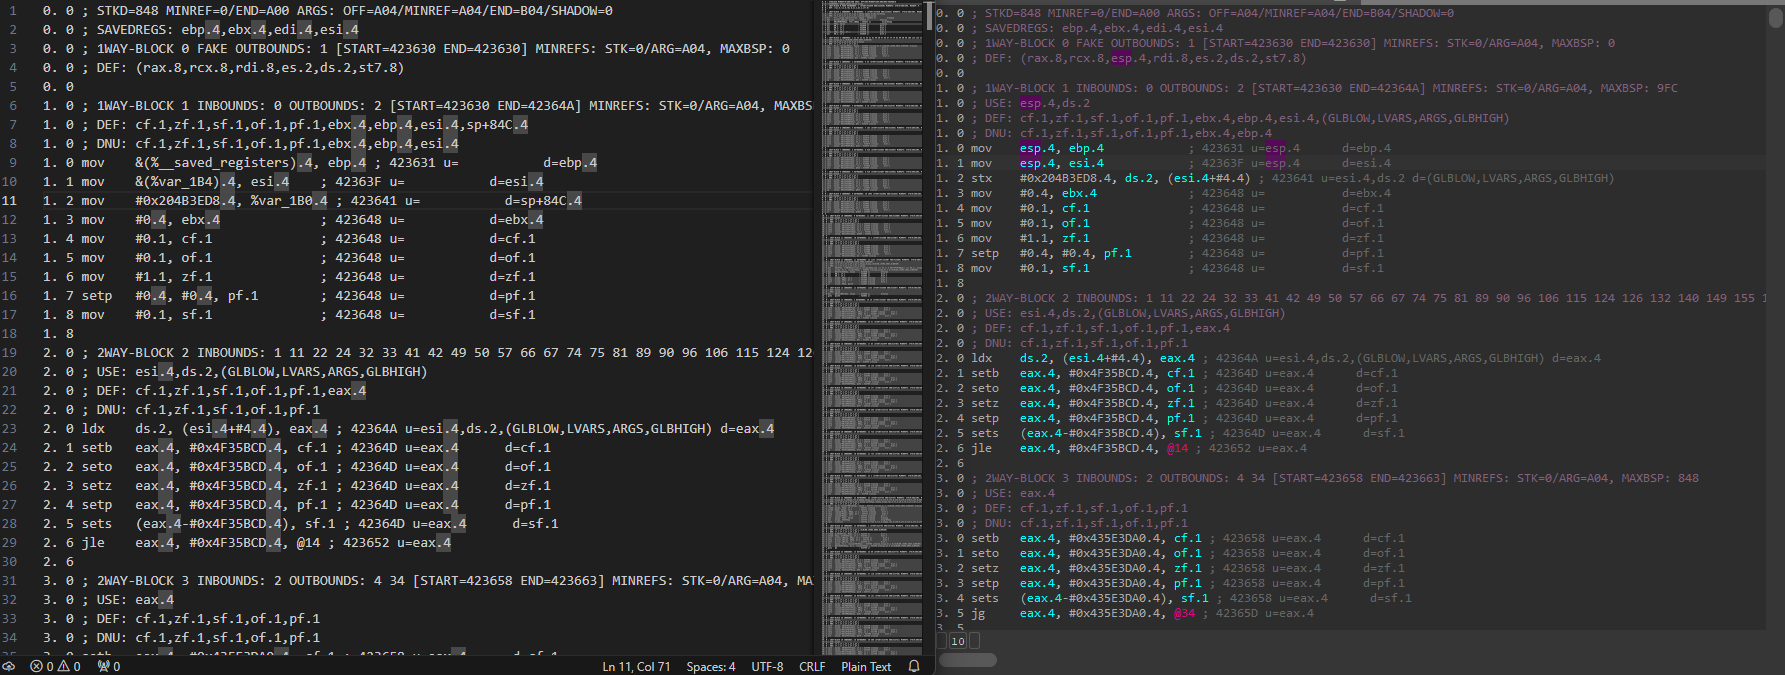
Implementing this was initially confusing, because I noticed that my microcode dump from the code was different than the dump in the microcode explorer:
According to Rolf, the reason for this was
When you register a block optimizer and check for MMAT_LOCOPT, you’re not getting called exactly at MMAT_LOCOPT, you’re getting called somewhere afterwards, between then and the next maturity level MMAT_CALLS. and you might get called more than once, so you might get called in the middle of this analysis that is transforming the stx and ldx into mov instructions.
This means that the microcode explorer and the code, despite being written to dump at the same stage, did not actually do so. The microcode explorer dump was at a slightly earlier stage of MMAT_LOCOPT that I was unable to operate at, hence why the code on the left has forwarded-propagated the mov in the first block (but not the second). After this incident, I mostly used microcode explorer strictly for initial analysis and relied on the dumps from the block optimizer callback for debugging.
The good news was that the idea worked. After trying again to decompile with the plugin enabled, all of the ldx/stx instructions were fixed and the dispatcher variable was found. There was another issue, however, and this one turned out to the most difficult and time-consuming for me to fix. I will use separate smaller function which has the same problem to explain.
Complex Branches
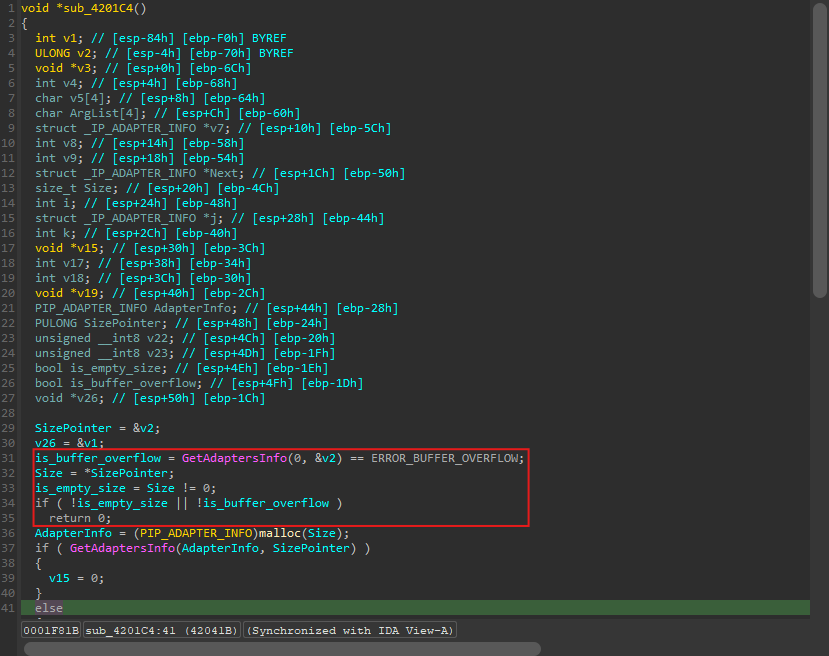
This is how the function looks after my final deobfuscator code has been ran:
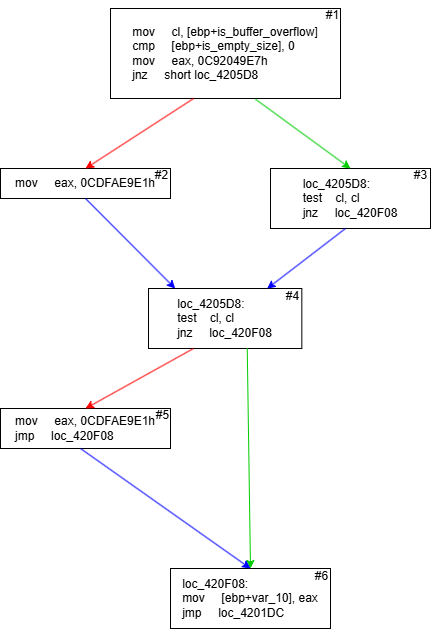
The above block of code calls GetAdaptersInfo() and then proceeds to check if the function returned a buffer overflow error or returned an empty size and exits if either condition is satisified. Now let’s look at the control flow graph of the generated assembly:
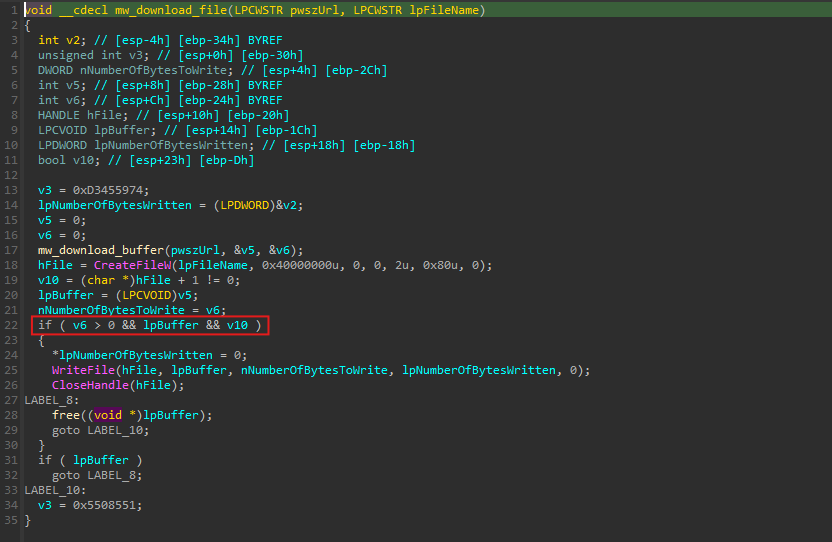
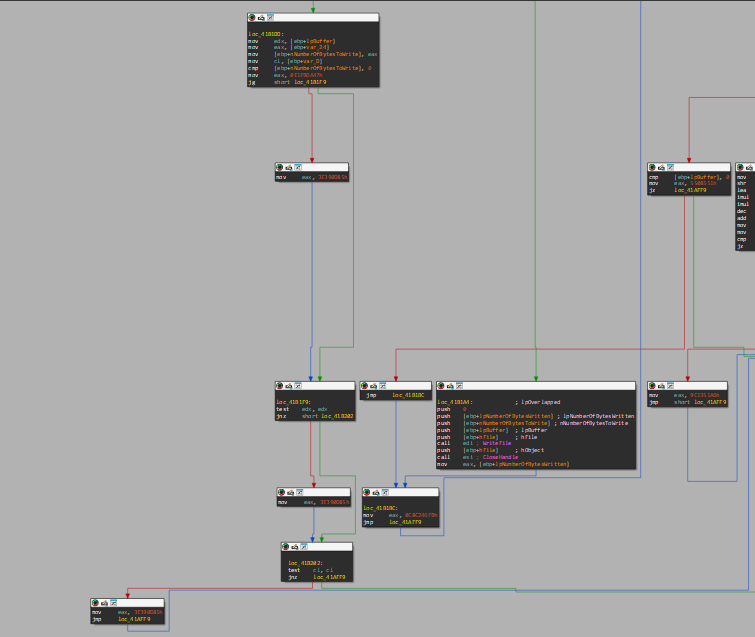
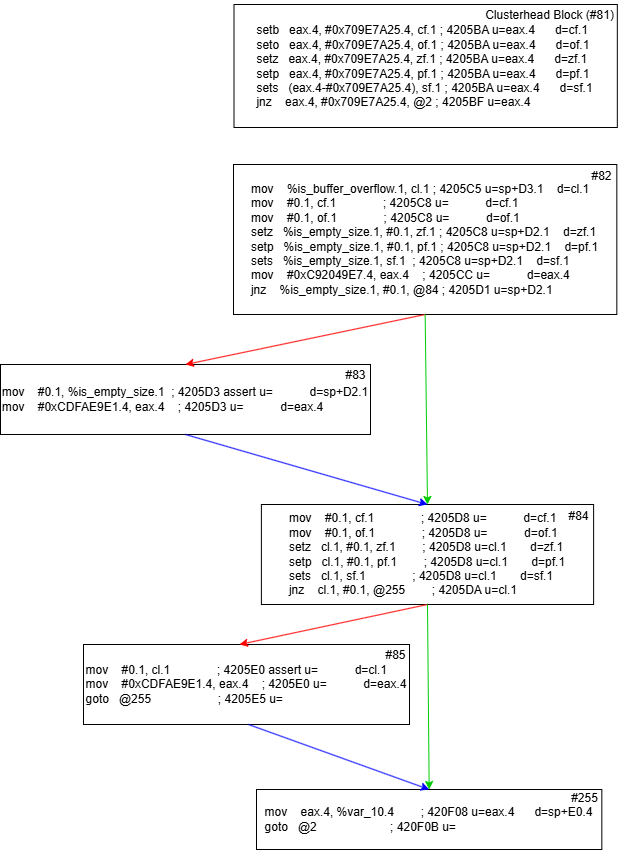
Since block #4 can have two possible values for eax (0xC92049E7 or 0xCDFAE9E1), that means there is no direct path to the dispatcher! This example is also a small one. There are cases where there are multiple checks being performed in the if block which can translate to even bigger chains of blocks such as this function:
That translates to the following assembly:
I call these cases complex branches, and I believe they’re mentioned in the D-810 writeup. So, how did I fix this problem as you can see in the screenshots of the decompiled code? Since the problem is due to multiple incoming blocks causing there to be no direct path to the dispatcher, I decided that all blocks on the path from cluster head to the dispatcher must only have a single predecessor. By this time, I had also noticed the problem from earlier regarding the optimization blocks which was also due to not having a direct dispatcher path. I was about to kill two birds with one stone.
To accomplish my goal of ensuring each block only has a single predecessor, I first iterate all of the dispatcher block’s predecessors. Then, if the dispatcher block predecessor we are looking at has more than two of it’s own predecessors (I’m going to refer to these as sub-preds), I iterate those until we reach number of sub-preds - 2. The reason I stop at count - 2 is because if the predecessor happens to have a fallthrough block, it will always be the last one located at count - 1. Additionally, if the dispatcher block predecessor is conditional, we also don’t want to remove the other branch which would be located at count - 2. For each iteration, I first check if the sub-pred is the child of a conditional block which is also pointing to the same dispatcher predecessor. If so, I point both the conditional parent block and the sub-pred to a new copy of the dispatcher block predecessor that I insert into the graph. Otherwise, I just point the sub-pred to the block and don’t touch the parent block. You can see this process illustrated below in the function we looked at that accesses the adapters:
Before:
1
2
3
4
5
6
7
8
9
10
11
12
13
14
15
16
17
18
19
20
21
22
23
24
25
26
27
28
29
; 1WAY-BLOCK 27 INBOUNDS: 26 OUTBOUNDS: 231 [START=420324 END=420329] MINREFS: STK=0/ARG=F8, MAXBSP: 84
goto   @231                    ; 420324 u=

....

; 2WAY-BLOCK 229 INBOUNDS: 150 OUTBOUNDS: 230 231 [START=420EEB END=420F03] MINREFS: STK=0/ARG=F8, MAXBSP: 84
; USE: sp+DC.4
; DEF: cf.1,zf.1,sf.1,of.1,pf.1,eax.4,ecx.4,sp+DC.4
; DNU: cf.1,zf.1,sf.1,of.1,pf.1,eax.4
mul    #0x1920000.4, (%var_14.4 >>l #7.1), ecx.4 ; 420EF1 split4 u=sp+DC.4    d=ecx.4
mov    ecx.4, %var_14.4        ; 420EF7 u=ecx.4      d=sp+DC.4
mov    #0x559A1BB7.4, eax.4    ; 420EFA u=           d=eax.4
mov    #0.1, cf.1              ; 420EFF u=           d=cf.1
mov    #0.1, of.1              ; 420EFF u=           d=of.1
setz   ecx.4, #0.4, zf.1       ; 420EFF u=ecx.4      d=zf.1
setp   ecx.4, #0.4, pf.1       ; 420EFF u=ecx.4      d=pf.1
sets   ecx.4, sf.1             ; 420EFF u=ecx.4      d=sf.1
jz     ecx.4, #0.4, @231       ; 420F01 u=ecx.4

; 1WAY-BLOCK 230 INBOUNDS: 229 OUTBOUNDS: 231 [START=420F03 END=420F08] MINREFS: STK=0/ARG=F8, MAXBSP: 84
; DEF: eax.4
; DNU: eax.4
mov    #0x937A5D68.4, eax.4    ; 420F03 u=           d=eax.4

; 1WAY-BLOCK 231 INBOUNDS: 27 ........ 229 230 OUTBOUNDS: 2 [START=420F08 END=420F10] MINREFS: STK=0/ARG=F8, MAXBSP: 84
; USE: eax.4
; DEF: sp+E0.4
mov    eax.4, %var_10.4        ; 420F08 u=eax.4      d=sp+E0.4
goto   @2                      ; 420F0B u=
After
1
2
3
4
5
6
7
8
9
10
11
12
13
14
15
16
17
18
19
20
21
22
23
24
25
26
27
28
29
30
31
32
33
34
35
; 1WAY-BLOCK 27 INBOUNDS: 26 OUTBOUNDS: 232 [START=420324 END=420329] MINREFS: STK=0/ARG=F8, MAXBSP: 84
goto   @232                    ; 420324 u=

....

; 2WAY-BLOCK 229 INBOUNDS: 150 OUTBOUNDS: 230 231 [START=420EEB END=420F03] MINREFS: STK=0/ARG=F8, MAXBSP: 84
; USE: sp+DC.4
; DEF: cf.1,zf.1,sf.1,of.1,pf.1,eax.4,ecx.4,sp+DC.4
; DNU: cf.1,zf.1,sf.1,of.1,pf.1,eax.4
mul    #0x1920000.4, (%var_14.4 >>l #7.1), ecx.4 ; 420EF1 split4 u=sp+DC.4    d=ecx.4
mov    ecx.4, %var_14.4        ; 420EF7 u=ecx.4      d=sp+DC.4
mov    #0x559A1BB7.4, eax.4    ; 420EFA u=           d=eax.4
mov    #0.1, cf.1              ; 420EFF u=           d=cf.1
mov    #0.1, of.1              ; 420EFF u=           d=of.1
setz   ecx.4, #0.4, zf.1       ; 420EFF u=ecx.4      d=zf.1
setp   ecx.4, #0.4, pf.1       ; 420EFF u=ecx.4      d=pf.1
sets   ecx.4, sf.1             ; 420EFF u=ecx.4      d=sf.1
jz     ecx.4, #0.4, @231       ; 420F01 u=ecx.4

; 1WAY-BLOCK 230 INBOUNDS: 229 OUTBOUNDS: 231 [START=420F03 END=420F08] MINREFS: STK=0/ARG=F8, MAXBSP: 84
; DEF: eax.4
; DNU: eax.4
mov    #0x937A5D68.4, eax.4    ; 420F03 u=           d=eax.4

; 1WAY-BLOCK 231 INBOUNDS: 229 230 OUTBOUNDS: 2 [START=420F08 END=420F10] MINREFS: STK=0/ARG=F8, MAXBSP: 84
; USE: eax.4
; DEF: sp+E0.4
mov    eax.4, %var_10.4        ; 420F08 u=eax.4      d=sp+E0.4
goto   @2                      ; 420F0B u=

; 1WAY-BLOCK 232 INBOUNDS: 27 OUTBOUNDS: 2 [START=420F08 END=420F10] MINREFS: STK=0/ARG=F8, MAXBSP: 84
; USE: eax.4
; DEF: sp+E0.4
mov    eax.4, %var_10.4        ; 420F08 u=eax.4      d=sp+E0.4
goto   @2                      ; 420F0B u=
Take a look at the after dump and you can see that the optimization block issue has been solved. Block #27 now points to a copy of the optimization block that has no other incoming blocks, so it would be safe to patch the goto @2 instruction to its correct location later on. After all dispatcher predecessors have been confirmed to have no more than two predecessors, we can handle the complex branches. To do so, I again iterate the dispatcher predecessors. This time, I create a ‘trace’ for each predecessor. The way I implemented tracing was to do a depth-first search from the dispatcher predecessor all the way up to the clusterhead. This will find every possible path to the clusterhead. I determine if we’ve hit the clusterhead by checking if its one of those jz/jnz comparison blocks from the beginning of our analysis. If so, the trace returns.
Once this is done, I call another function which takes the trace information and turns it into a basic integer array of all the possible paths we found using the blocks’ serials.
1
2
3
4
255 84 82 81
255 84 83 82 81
255 85 84 82 81
255 85 84 83 82 81
For reference, here is a control flow graph of the microcode after all dispatcher predecessors have been ensured to have no more than two predecessors. You can follow along yourself and see each possible path from the list above!
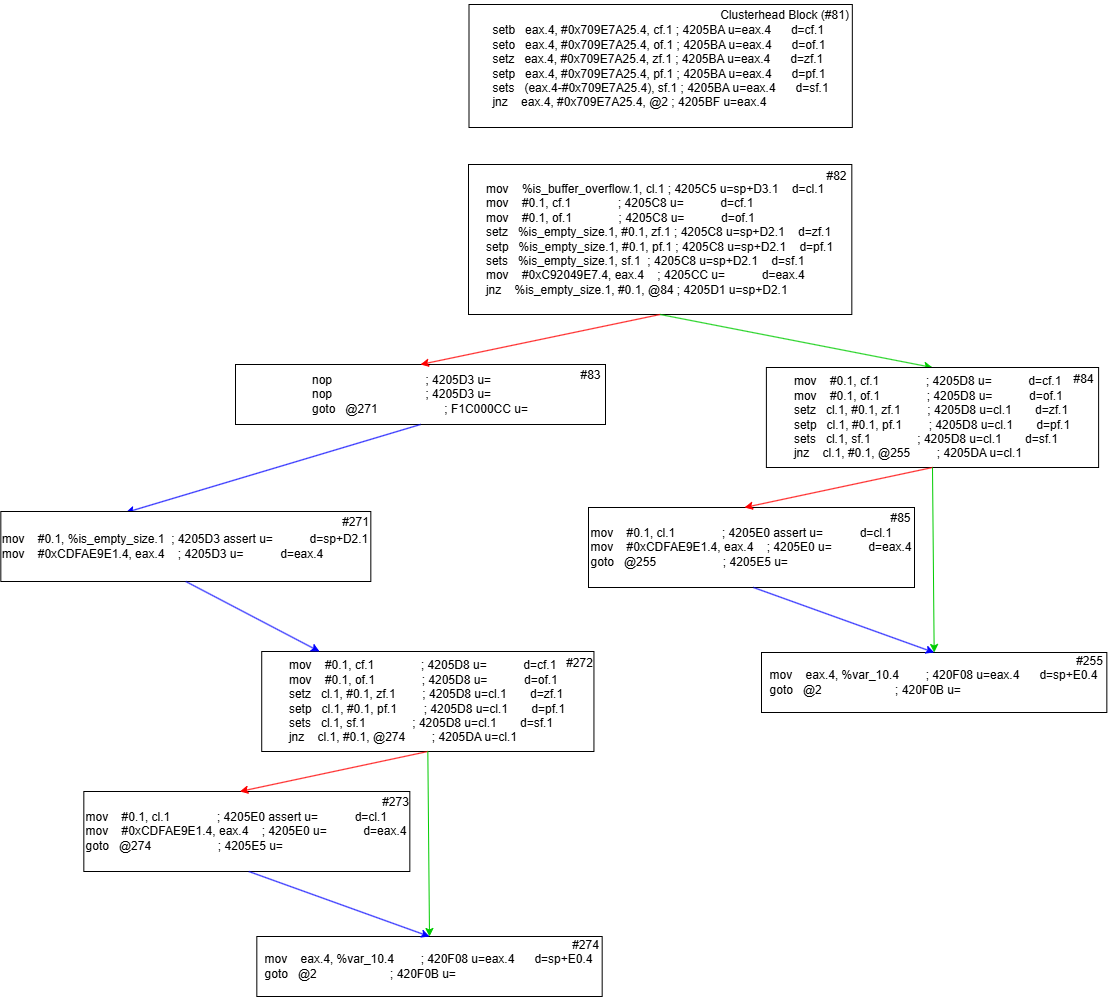
Now that I have the trace, there are a few cases we need to handle. In the case above, there are four possible paths. When this happens, I keep only the bottom two paths. Next, I check where the paths diverge from eachother. In the case of the bottom two paths, the divergence occurs at index 3. I then copy the blocks from below the divergence of the last path. This would mean that blocks 83, 84, 85 and 255 are copied. I patch block 83 to be a jump to the newly copied block path.
Here is how the control flow graph looks after the modifications.
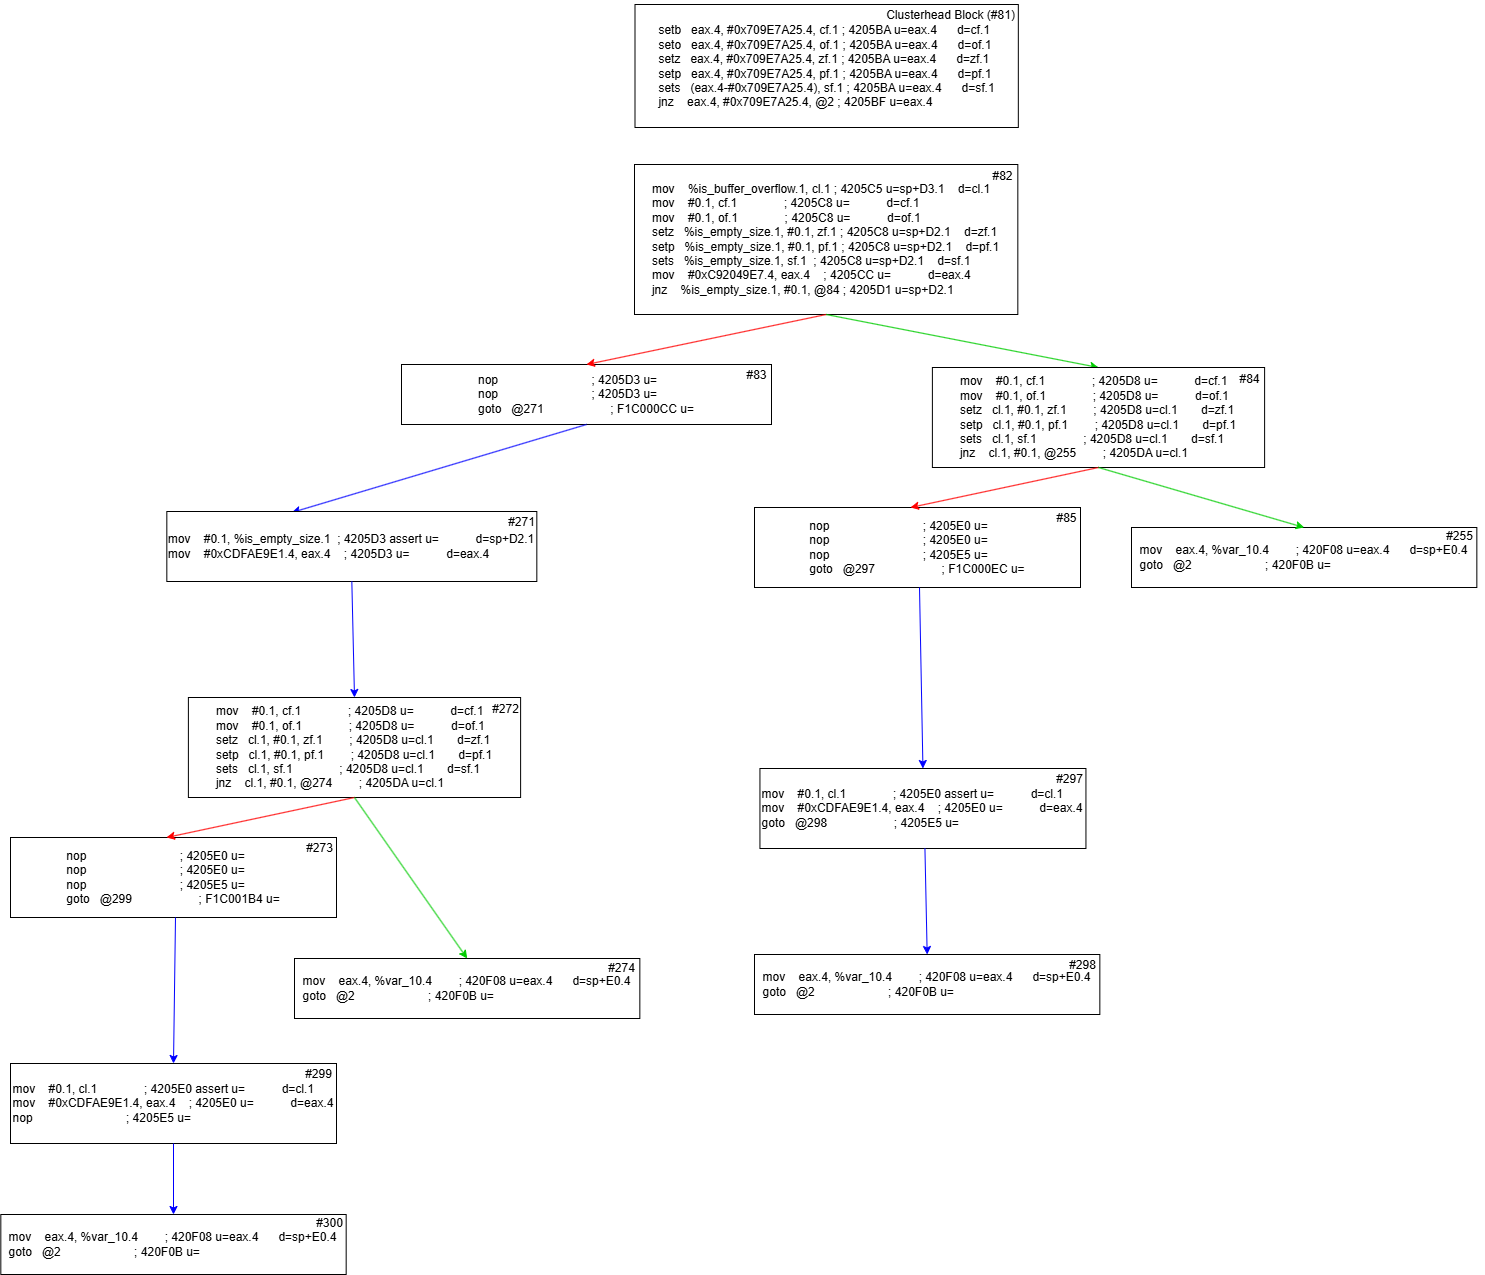
As you can see, the divergence issue has been fixed. Now, just two more passes are required to handle the two predecessors of blocks 274 and 255 respectively. Below is the final product with no path issues, which is ready to be unflattened!:
For complex branches that have a few different checks inside of the if block, it will take subsequent passes of the loop to complete, which is why the loop does not exit until all blocks have a direct path to the dispatcher.
There are a few other cases we need to handle though. Firstly, sometimes we’ll get three possible paths such as here:
1
2
3
421 419 418 258
421 420 199 198 197 196
421 420 419 418 258
What do we do in that case? Well, by taking a look at the paths above it is apparent that one path looks very different from the others. That would be the middle path, and the first immediate indicator is that the end block is different (196 vs 258). When this happens, I copy the entire block range that the oddball path takes (421, 420, 199, 198, 197) and point the first block (196) to that instead. That ensures we can safely work on the remaining two paths.
Secondly, what if we end up with two paths that start with different blocks? Here are some examples I dealt with in mw_main_routine:
1
2
1276 359 358 357
1276 359 358 457
or
1
2
442 441
442 743
or
1
2
628 627 457
628 627 626
When this happens, I ensure that the path I modify is not the fallthrough branch of a conditional block. These would be 1276 359 358 357, 442 441, or 628 627 626 above respectively. Since we can’t copy the path down from the divergence and point the conditional block there, we simply take the other available path in the path list and modify that one instead.
Conditional Starts
Now, after all this are we finally ready to get to the actual unflattening part? NOPE! There is yet another problem we need to deal with.
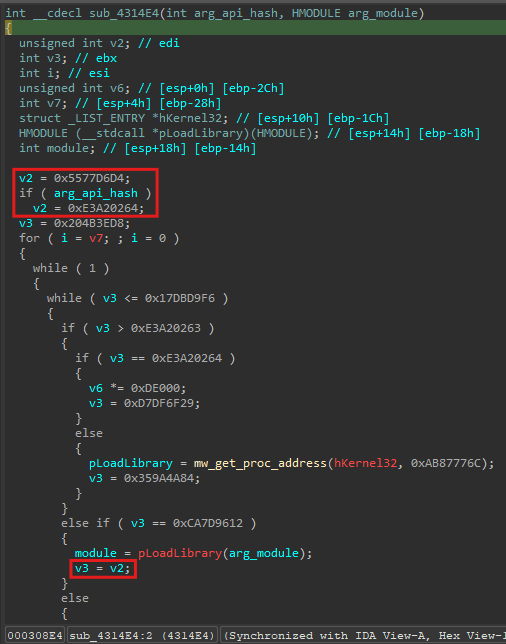
Take a look at this function:
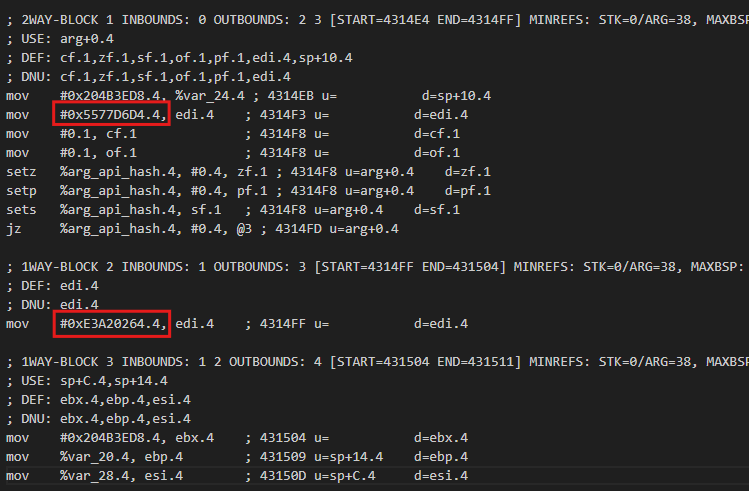
The variable v3 is the variable which controls the control flow. However, a variable v2 is being set at the beginning depending if the argument arg_api_hash is empty. v2 is not being used until later on, when v3 takes its value. I had never seen any other control flow unflattening writeup that ran into such an issue, and I came up with my own solution. Here is my idea:
1) Identify the two possible conditions and the register (or stack variable in some cases) that the constants are moved into (in this case EDI):
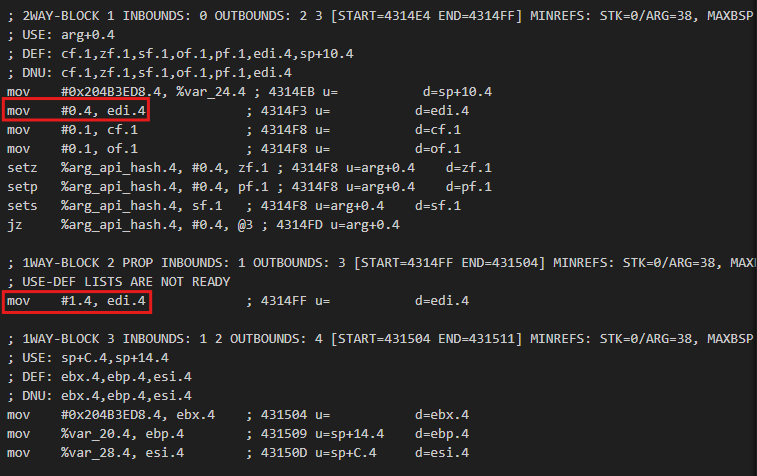
2) Replace each constant with a 1 or 0 (representing true/false)
3) Where the actual final fix for the conditional start happens is during the actual unflattening stage when we are iterating each dispatcher predecessor and see this:
When we find an assignment to ebx (the variable the dispatcher uses) from the variable that was saved at the beginning when we noticed there was a conditional start (edi), we change the affected block to a branch by making it a jz. This jz will check if edi is 0 or not (remember we switched the mov instructions at the beginning to move 1 or 0 instead of the block assignment number?)
Then, it will jump to whichever case is bound to 0 or 1. Here is how it looks after:
This plan seemed like a solid idea. The problem is that I seemed to possibly be encountering a Hex-Rays bug, particularly an incorrect optimization that prevented the decompilation from being correct. I contacted them about this issue and they acknowledged it, but I have not heard back. This would not be the first time I ended up breaking Hex-Rays while working on this project, as I identified another incorrect optimzation prior to this which I contacted them about and that they actually did fix for IDA 9.0.
Unflattening…finally!
Now that we have addressed all possible issues preventing us from unflattening, it is time to get it done. I do need to mention as well that I completely redid the DeferredGraphModifier class from the original plugin. Now, it uses a queue and supports many different operations which can be done to the graph:
1
2
3
4
5
6
7
8
enum graph_modification_type
{
	block_target_change,
	block_fallthrough_change,
	block_nop_insns,
	new_block_insertion,
	block_convert_to_branch
};
I strongly suggest doing this and queueing up all your graph modifications. I made the mistake of trying to do a lot of graph changes during the loop iteration which caused lots of problems and wasted time.
The way I did unflattening was to trace the writes to the dispatcher variable until we got to a numeric constant. Then, I would remove the entire chain of write instructions later on. An important thing I did was to defer my instruction removals. What I mean by this, is after we patch the goto’s at the end of each flattened block to go to the proper destination, we want to remove the instruction which moves that numeric value into the dispatcher control variable, right? Well, what if we have a branch that sets the control flow variable? This means if conditional block a branches to either block b or c and we are currently unflattening b and trace the writes into a and remove the instruction, then by the time we get to block c we have no idea what value it should be using. All instructions that need to be removed now get removed AFTER the unflattening process is done.
The end result will be a completely unflattened graph, right? I revisited the main function excited to see the end result.
…and was greeted with disappointment. I spent so much time on the unflattening, I had forgotten all about the opaque predicates from the beginning! They were still there, and causing all sorts of problems. Determined to get a clean decompiler output once and for all, I set my sights on removing them.
Opaque Predicates / Junk Code
I ran into several issues trying to remove the opaque predicates. Firstly, legitimate instructions get interwoven with the opaque predicates / junk code. Based off of the few functions I had looked at when I originally tried to remove them, it sufficed to simply erase the entire affected block by filling it with nops. I later found out the consequences of doing this, so I had to change my strategy.
1
2
3
4
44. 0 xdu    [ds.2:(%var_B4.4{85}+#3.4)].1, %var_4C.4{68} ; 4332CA u=ds.2,sp+18.4,(GLBLOW,GLBHIGH) d=sp+80.4  <-------------------legit instruction thats getting removed!
44. 1 mul    (%var_BC.4{71}-#0xFA.4){70}, (%var_BC.4{71}-#0xFA.4){70}, eax.4{72} ; 433336 split4 u=sp+10.4    d=eax.4
44. 2 sub    (((#0x8A.4*%var_BC.4{71})-#0xC210.4) >>l #0xD.1), #0x20.4, %var_BC.4{73} ; 433352 u=sp+10.4    d=sp+10.4
44. 3 jnz    eax.4{72}, ((#0x139F.4*eax.4{72})-#1.4), @67 ; 43335D inverted_jx u=eax.4
The above is a screenshot from MMAT_CALLS showing how legitimate instruction can appear in blocks that have junk instructions. You may be wondering why I’m suddenly at MMAT_CALLS after spending the entirety of this project working at MMAT_LOCOPT. Well, I was originally trying to remove the opaques/junk at MMAT_LOCOPT and was running some issues. See how each instruction, despite containing a ton of operations only is technically one line? During MMAT_LOCOPT, Hex-Rays had not performed any optimizations on the instructions and I was getting all sorts of different instruction patterns which broke my signature.
1
2
3
4
5
6
7
8
9
10
11
12
13
14
15
226. 0 ; 2WAY-BLOCK 226 INBOUNDS: 131 OUTBOUNDS: 227 228 [START=43332C END=43335F] MINREFS: STK=0/ARG=D0, MAXBSP: 8
226. 0 ; USE: sp+10.4
226. 0 ; DEF: cf.1,zf.1,sf.1,of.1,pf.1,rax.8,ecx.4,sp+10.4
226. 0 ; DNU: cf.1,zf.1,sf.1,of.1,pf.1,ecx.4
226. 0 mul    (%var_BC.4-#0xFA.4), (%var_BC.4-#0xFA.4), eax.4 ; 433336 split4 u=sp+10.4    d=eax.4
226. 1 sub    (#0x139F.4*eax.4), #1.4, edx.4 ; 43334B u=eax.4      d=edx.4
226. 2 sub    (((#0x8A.4*%var_BC.4)-#0xC210.4) >>l #0xD.1), #0x20.4, %var_BC.4 ; 433352 u=sp+10.4    d=sp+10.4
226. 3 mov    #0xB2BA095E.4, ecx.4    ; 433356 u=           d=ecx.4
226. 4 setb   eax.4, edx.4, cf.1      ; 43335B u=rax.8      d=cf.1
226. 5 seto   eax.4, edx.4, of.1      ; 43335B u=rax.8      d=of.1
226. 6 setz   eax.4, edx.4, zf.1      ; 43335B u=rax.8      d=zf.1
226. 7 setp   eax.4, edx.4, pf.1      ; 43335B u=rax.8      d=pf.1
226. 8 sets   (eax.4-edx.4), sf.1     ; 43335B u=rax.8      d=sf.1
226. 9 jz     eax.4, edx.4, @228      ; 43335D u=rax.8
226. 9
I decided to keep everything related to the unflattening in MMAT_LOCOPT, and wait until MMAT_CALLS to begin the opaque predicate removal. Thus, my plugin operates at two separate microcode maturities. While at the MMAT_CALLS stage, I was able to create a working signature to detect and find opaque predicate blocks.
The way this worked was to look for conditional blocks which multipled by a 16 bit constant and then subtracted the constant 1. I store all stack variables that were accessed by these blocks and kept track of their count every time another block was detected. I patch each opaque predicate to remove its fake branch depending on if it was jz or jnz. Then, I used the most common stack variable stored from earlier to find other leftover junk instructions that got interwoven with other blocks and remove them.
And what is the end result?
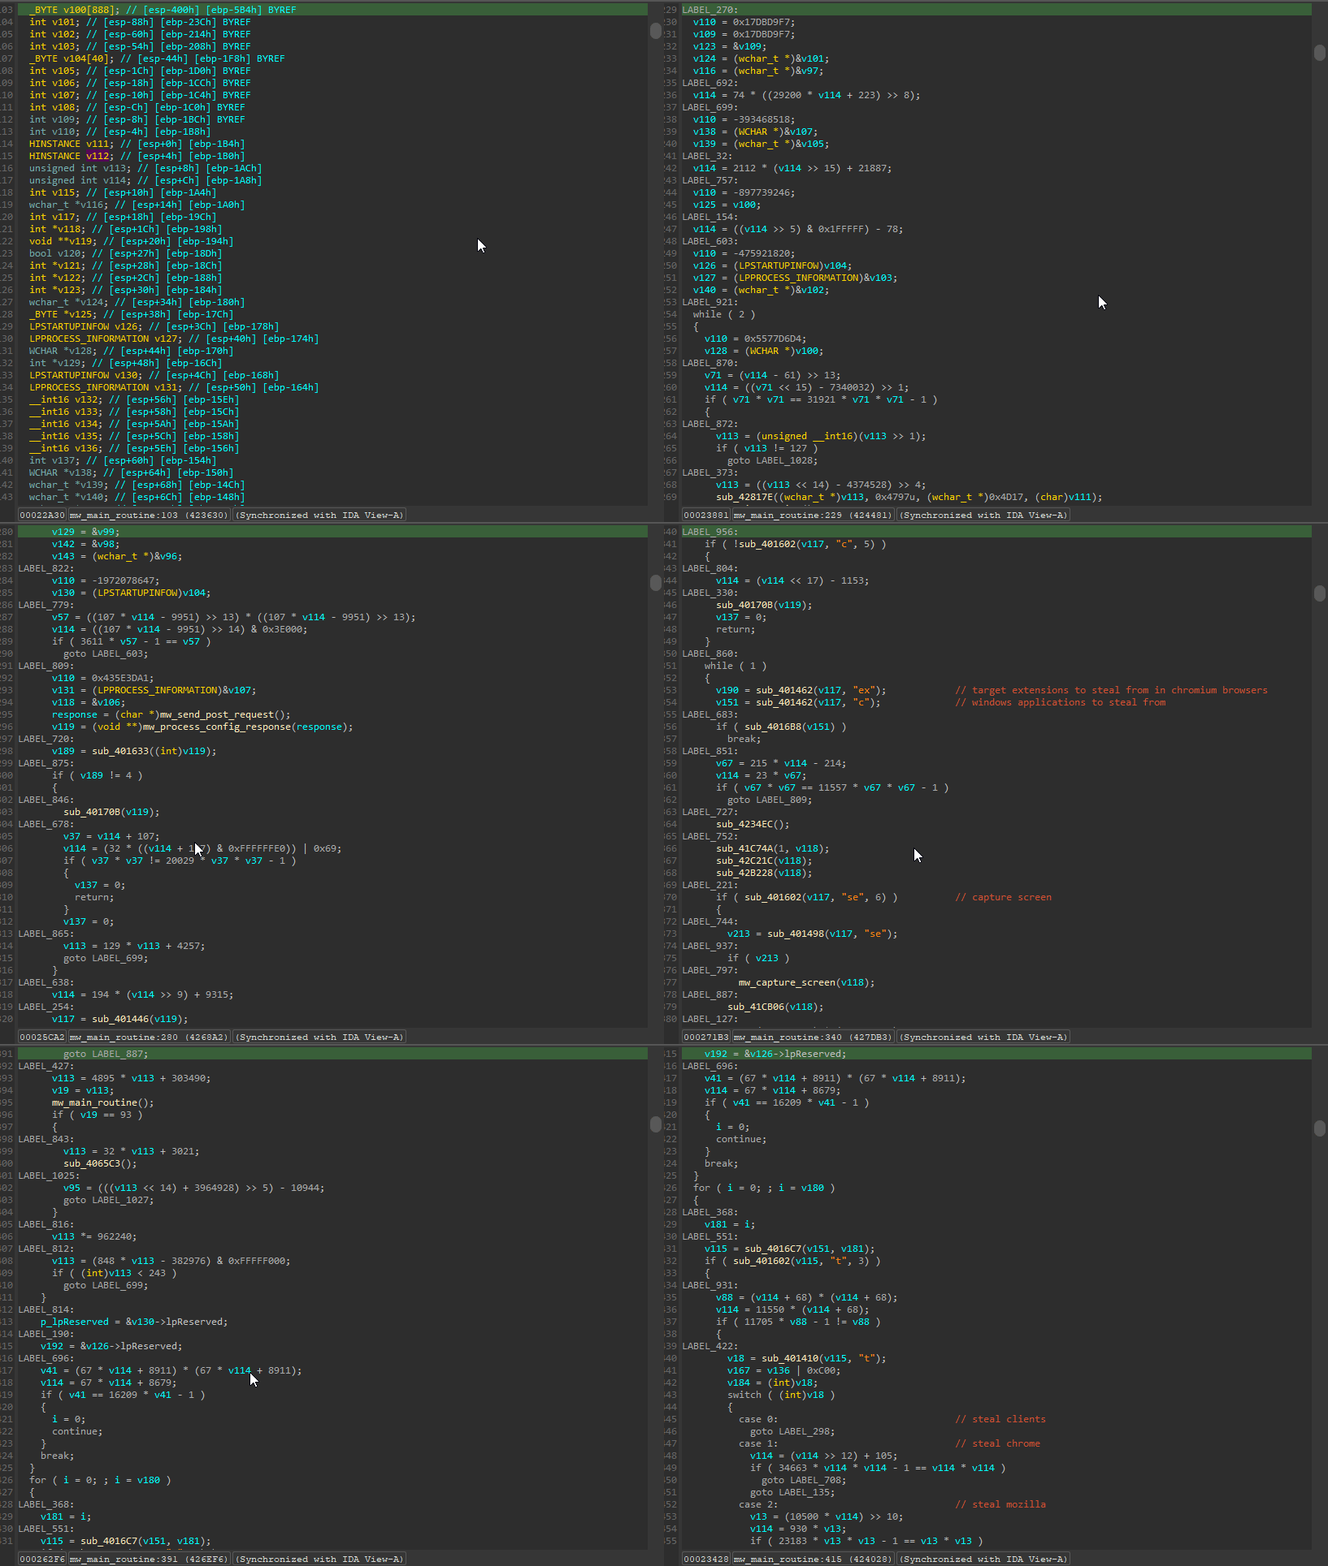
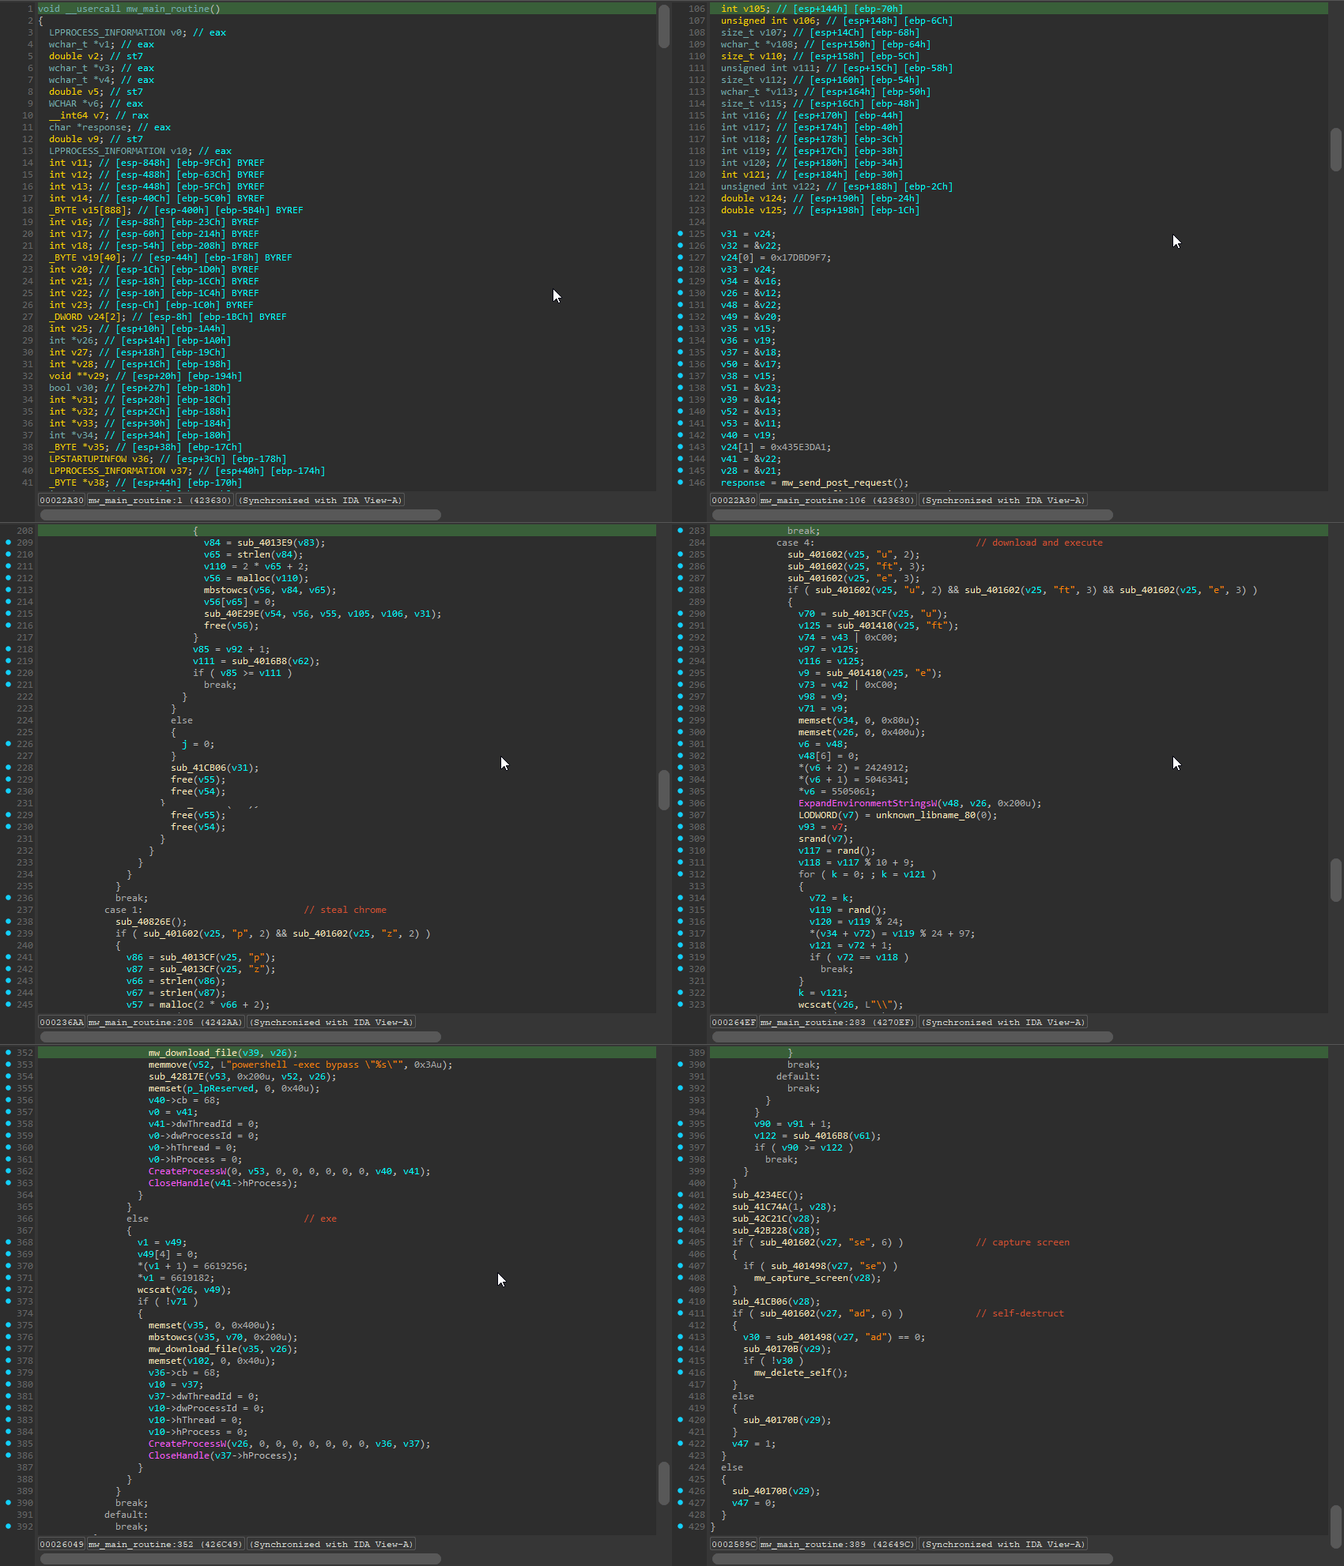
Fully deobfuscated code! Our largest function in the binary went from over 3000 lines of code to 429.
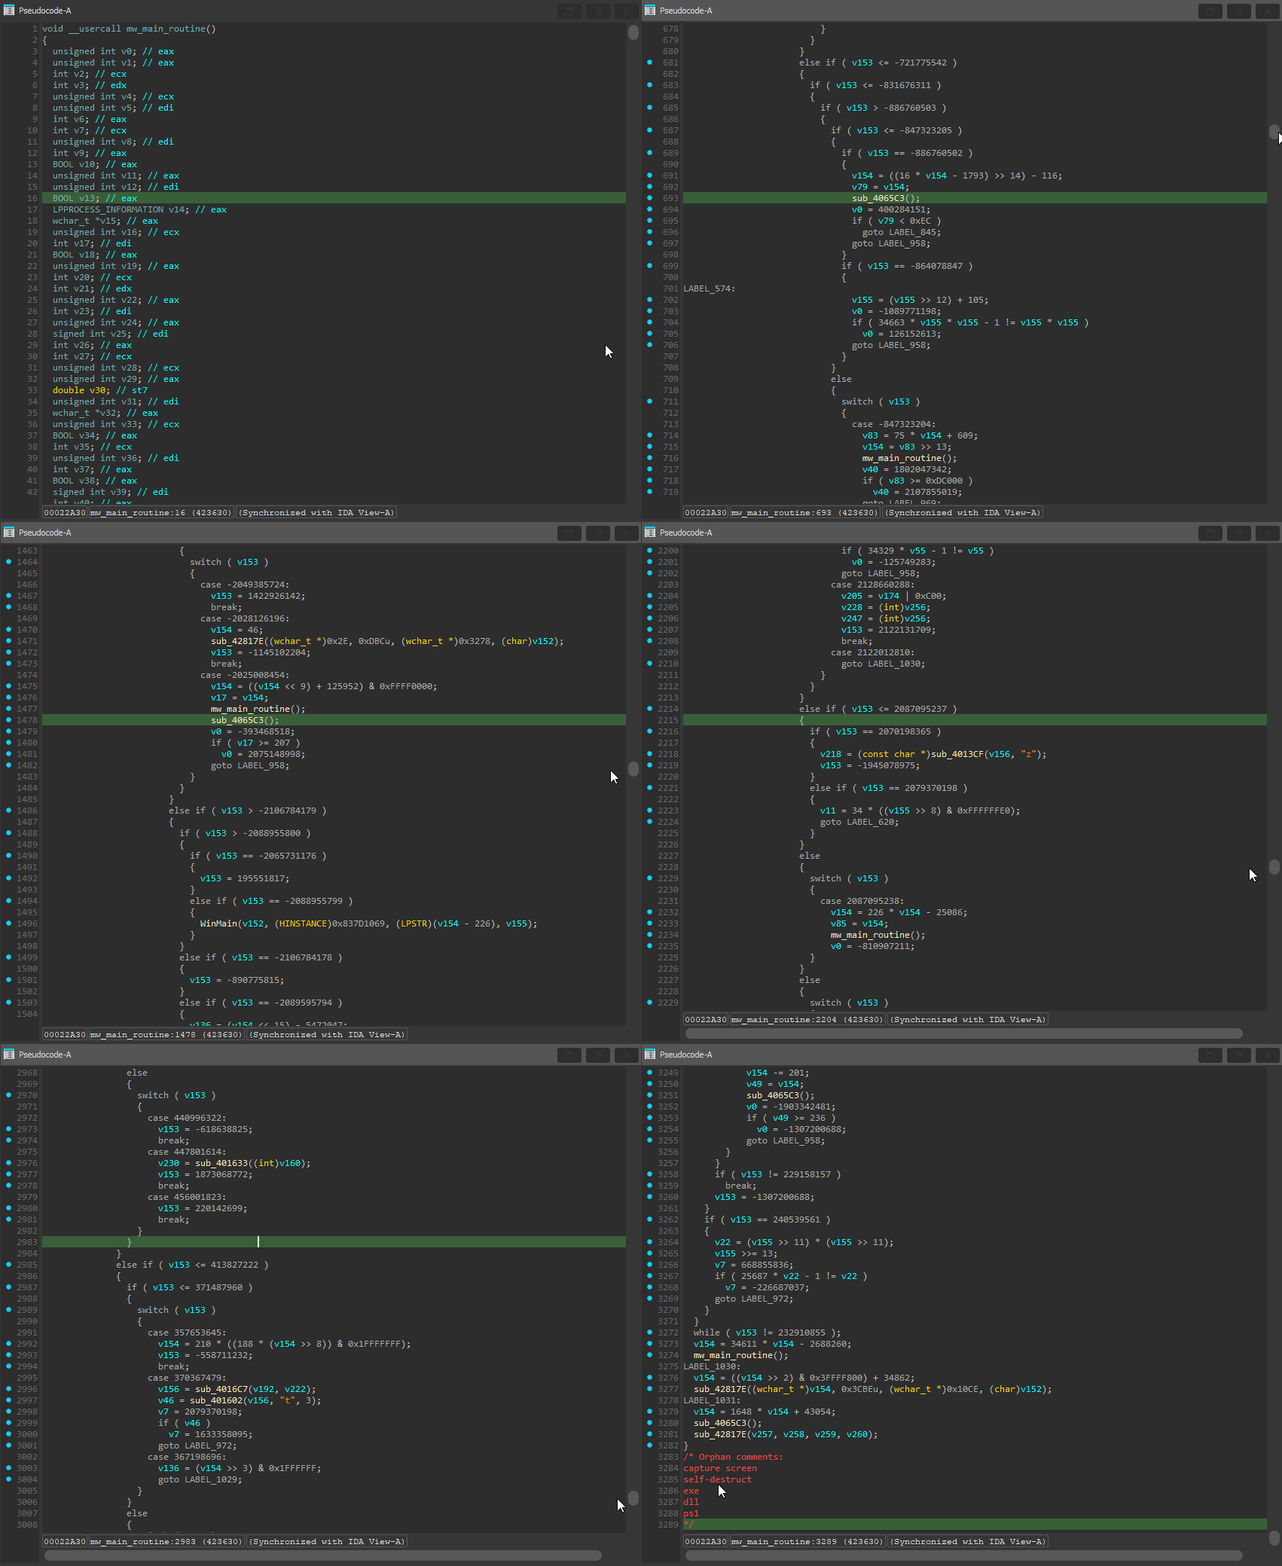
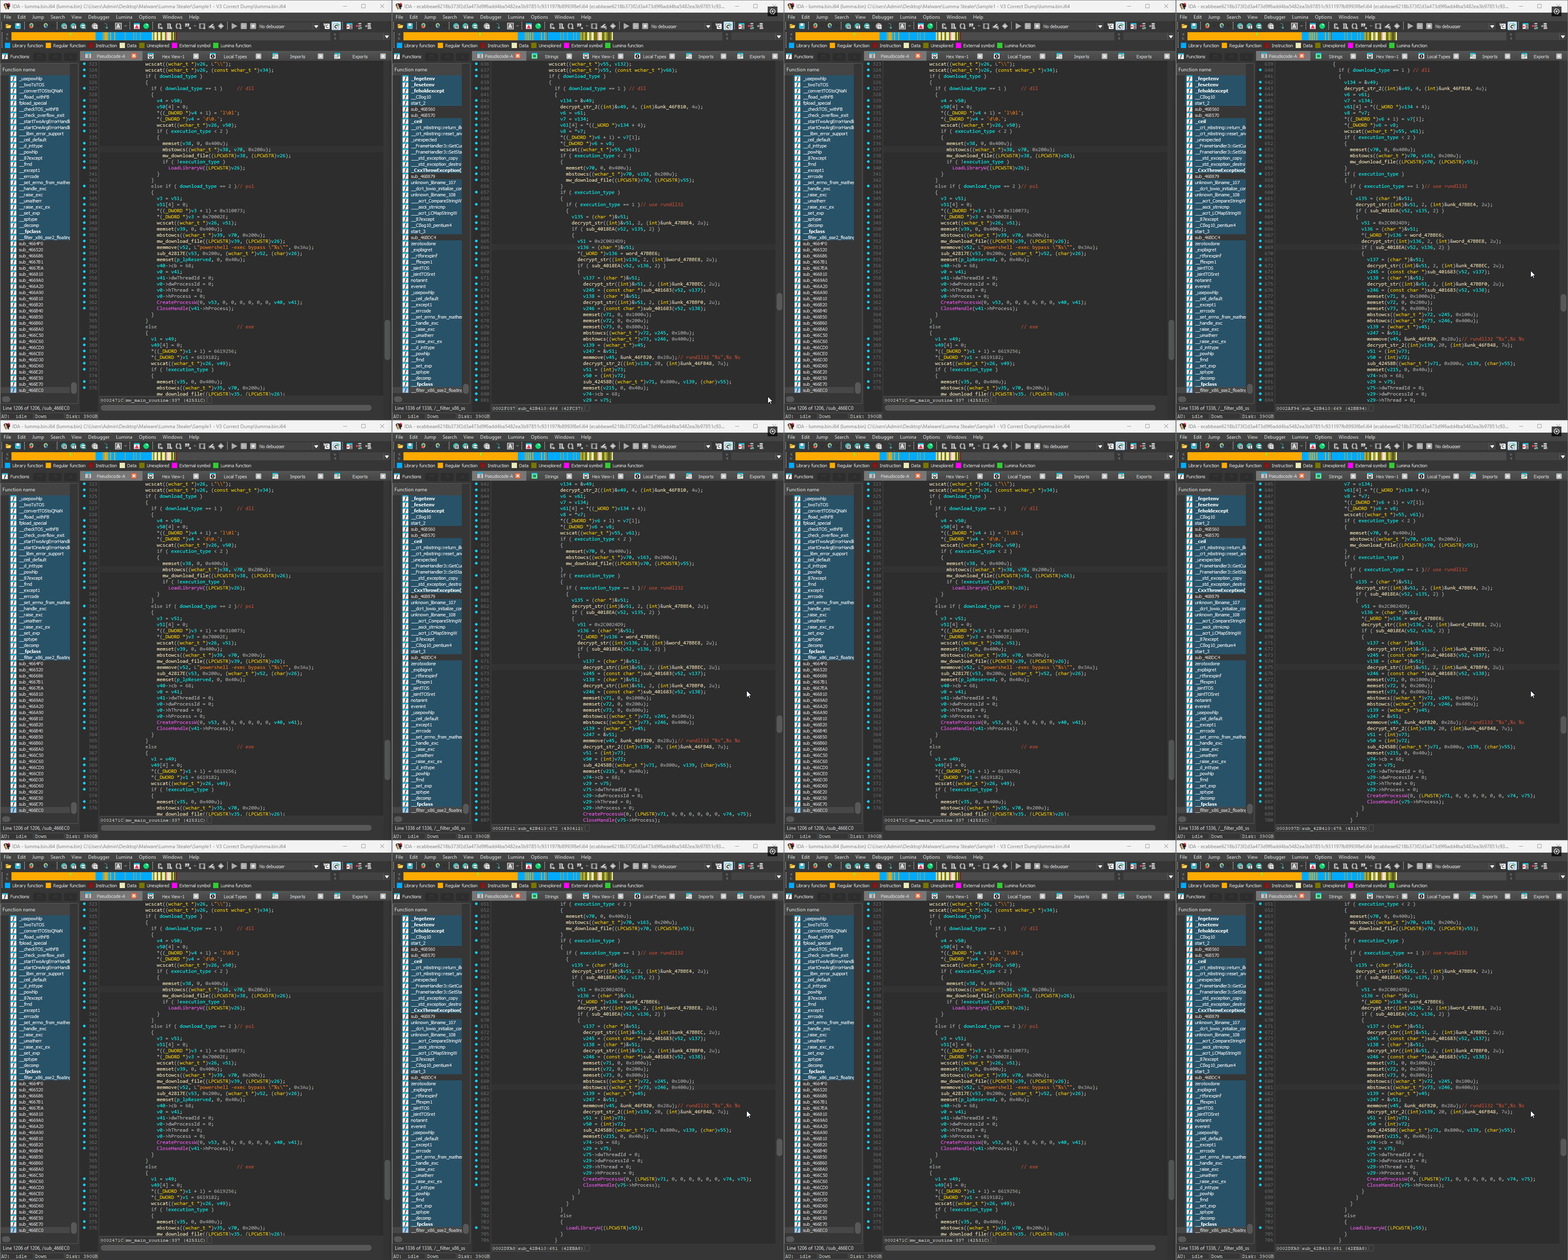
The great thing about the deobfuscator is that since it works on subsequent versions (until they added control flow indirection), we can easily track the evolution of the malware. For example, the same large function is actually even larger in a different Lumma binary I found at over 5000 lines of code. In this version, the developers added string encryption as well as implemented the option to choose between two possible execution methods: LoadLibraryW and rundll32 for DLLs. This feature is missing in the previous version as seen below:
Journey’s End
In the end, I ended up deobfuscating probably around 50 opaque’d and flattened functions. This project was one of the hardest yet most rewarding I’ve ever done. There were many times I felt like I was trying to do something that couldn’t be accomplished, but I was relentless and would not give up. I have to give a huge thanks to Rolf Rolles for not only creating the original plugin project that this was based off of, but also being kind enough to answer my questions about Hex-Rays internals. Without his incredible knowledge of the microcode API, I don’t know if I’d ever have been able to finish this project.
The next addition to this project would probably be a microcode emulator. Lumma Stealer didn’t require one, but there are other malware families which likely would. Another feature I’d be interested in implementing is a profile system, maybe similar to what D-810 has although I have not looked at it in detail. All in all, there are endless possibilities for this project and it will surely come in use for analyzing obfuscated samples in the future. I hope you enjoyed reading this writeup as much as I did writing it, and I can’t wait to publish more in the future!
Lumma Stealer Sample SHA256: 00F1A9C6185B346F8FDF03E7928FACFC44FC63E6A847EB21FA0ECD7FB94BB7E3
Lumma Stealer Sample #2 SHA256: ECABBEAE6218B373F2D3A473D9F6ADD4BA5482EA3B97851C931197FB8993F8EF
